Construction Site Birthday Cake
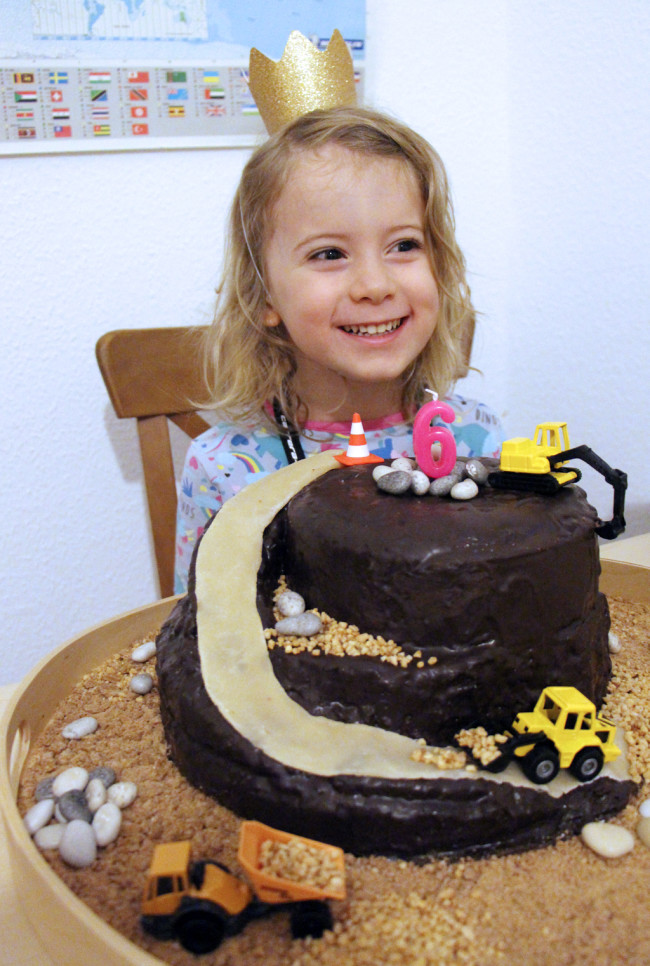
So, today we celebrated The Boy’s sixth birthday! It’s such a cliche to say it, but goodness how quickly they grow up! Stop the clock please. Anyway, it was a much anticipated event – he is the youngest in his class at school and the only one to start school age five, so he couldn’t wait to turn six like the rest of his classmates. And with every good birthday comes a cake! His instructions wishes were: chocolate, vanilla and cars on top! When I spotted some construction site cars at the department store whilst picking up some last minute birthday presents, I thought a construction site cake would be a fun idea to try. I had a minor panic when the husband pointed out “that’s a digger, not a car, diggers are not cars” (shows how much I know about cars), but I confidently ploughed ahead with my idea and the birthday boy was absolutely delighted. Phew!
Making the cake was actually a joint effort, combining our technical and design cake skills (have we been watching too much Bake Off?), and although a little time consuming – it took about two hours, not including baking time – it’s much easier than it looks (especially since I used cake mixes). Most of the ‘wow’ effect comes from the finishing touches. Anyway, so I thought I’d share the step-by-step process here with you, for anyone who wants to have a shot at it themselves.
These are the basics I used:
- One box of vanilla cake mix.
- Two boxes of chocolate cake mix.
- One 250g jar of chocolate spread.
- Four 125g bags of chocolate glaze (I used ‘Dr Oetker Kuchen Glasur Dunkel’). If you don’t have access to ready made chocolate glaze, you can look up a recipe and basically make around 500g of glaze.
- A small block of plain marzipan (you could also use fondant instead).
- Icing sugar.
- One packet of sand coloured biscuits (I used Spekulatius, which are widely available in Germany this time of year, but e.g. Digestives would also work really well).
- A couple of toy construction site vehicles.
- Two round cake tins, 18cm and 26cm in diameter.
- A large tray with a rim.
- Rolling pin.
- Some tin foil.
- A freezer bag or similar.
And these are some optional extras:
- Haselnusskrokant (sold in baking sections in German supermarkets – apparently it’s called ‘hazelnut brittle’ in English, but brittle to me is much larger chunks – finely chopped nuts would also work well).
- I discovered some liquorice that looks like stones at a local shop, on the morning of cake making day – must have been fate! On a miniature construction site they would look like boulders, so of course I grabbed a bag.
- I also borrowed some toy traffic cones from the boys’ Playmobil box.
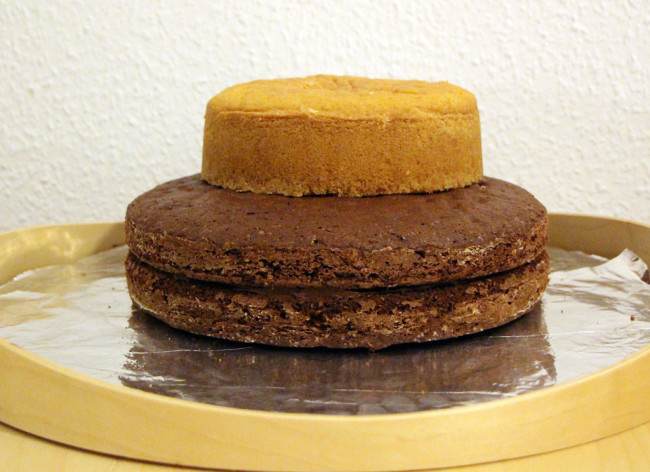
Step 1: Bake the cakes in advance! I baked two of these the night before, and one on the morning of cake making day. I baked one 18cm vanilla cake, and two 26cm chocolate cakes.
Step 2: Sandwich the two chocolate cakes together with the chocolate spread. Sit the vanilla cake on top of the chocolate, but don’t stick it in to place as you will want to move it around during assembly. NOTE: Assemble the cake on the tray you will be presenting it on, as you won’t want to risk moving and break it. I lined our tray with tin foil to protect it a little.
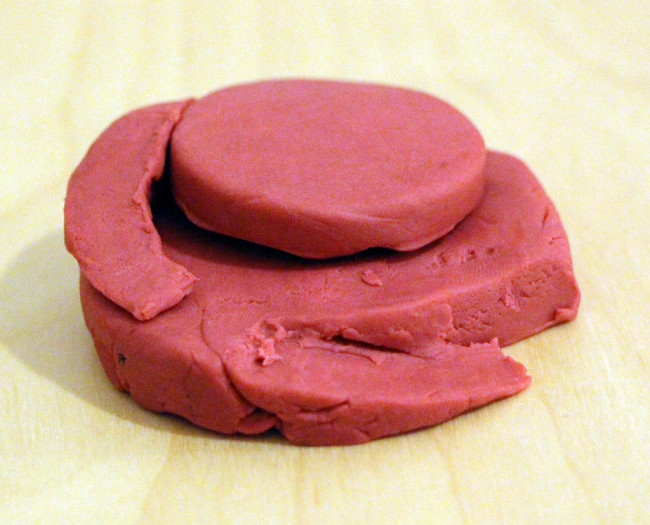
Interim Step: Make a model out of Play-Dough before cutting in to your cake for real, as you only get one chance at this! The Husband wanted me to include the Play-Dough model in the tutorial :) Basically, what you will need to do is cut a downward sloping ramp out of the side of the bottom cake, then flip the bit you cut out upside down to create a second ramp leading up to the top of the vanilla tier.
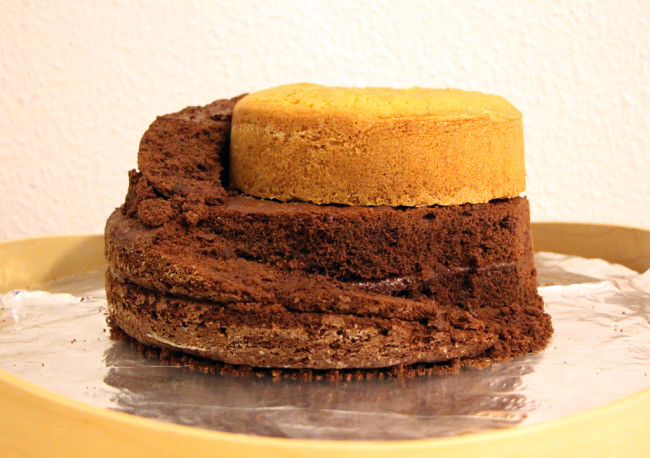
Step 3: Repeat the Play-Dough step above, but this time for real! We slid the vanilla cake over to the side instead of keeping it centre, then trimmed the bit we’d cut out to make the bottom ramp, to create the top ramp. This involved shoving some of the trimmed off bits in the spaces to stabilise it, which looked a bit messy, but the glaze was going to cover all that anyway.
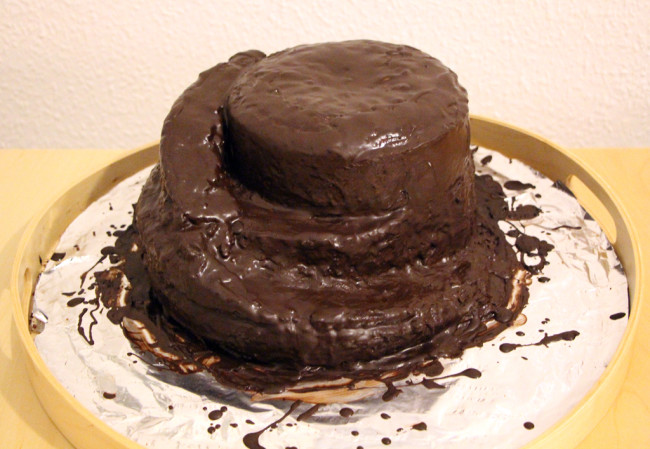
Step 4: Cover your entire cake in chocolate glaze! The Dr Oetker stuff sets fairly quickly, which meant everything was soon firmly held in place. As you can see, we made a bit of a mess…
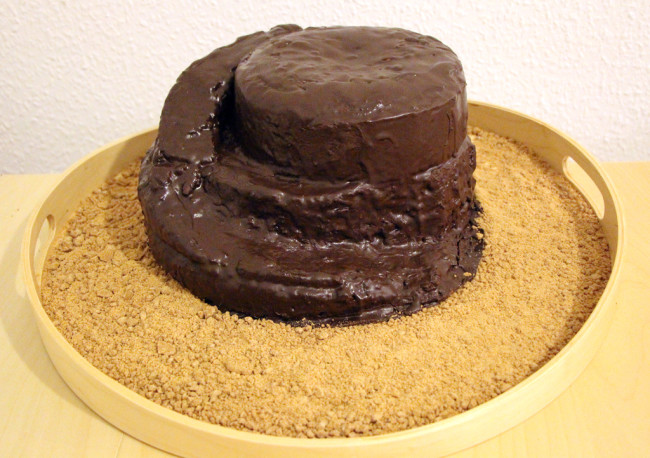
Step 5: Crush up your biscuits – we stuck them inside a freezer bag and bashed them with a rolling pin – then spread them around the base of the cake, covering the tray. Voila – bye bye mess!
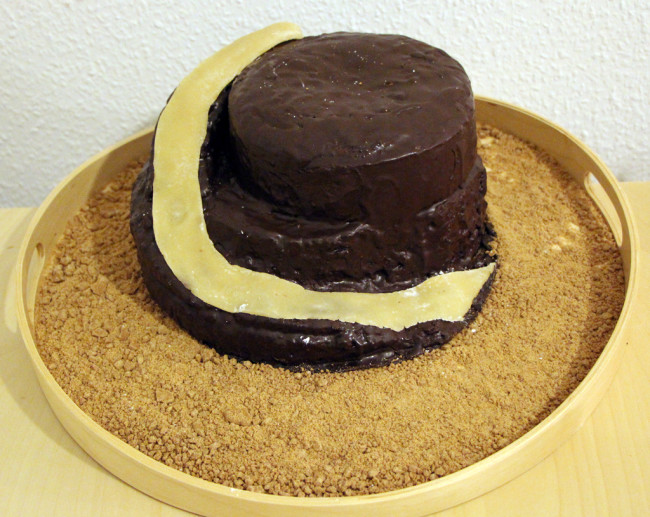
Step 6: Using the marzipan (or fondant), roll out a long strip as wide as your ramp and long enough to reach from the bottom to the top. Sprinkle some icing sugar on the table underneath and on your rolling pin to stop the marzipan sticking. TIP: If you end up with any icing sugar patches on the final marzipan or the rest of the cake (as seen in the photo above), just dip your finger in some cold water and gentle brush over any patches to make them disappear.
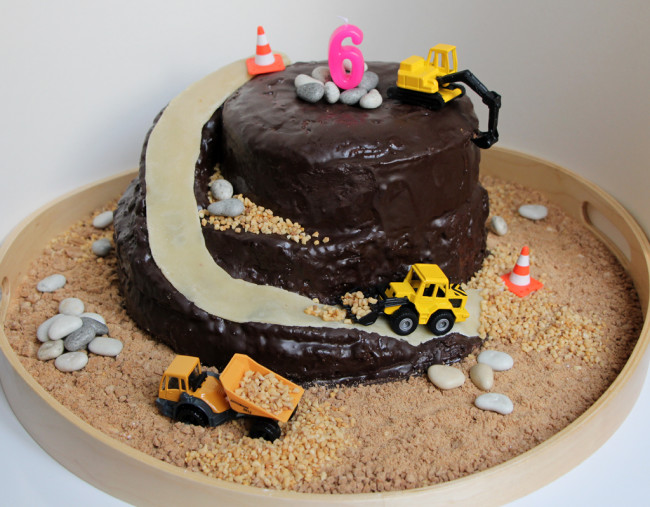
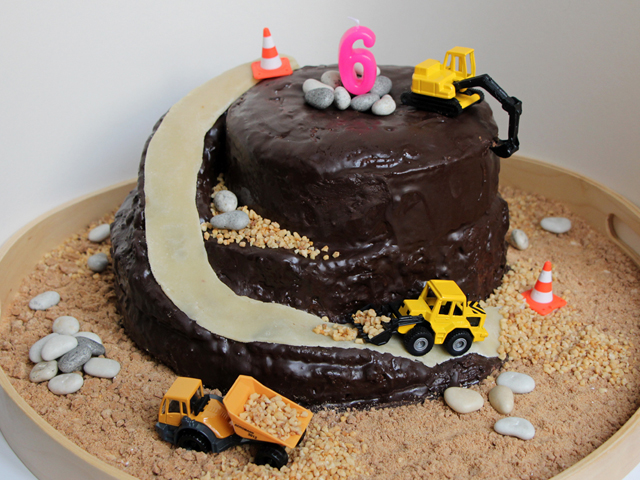
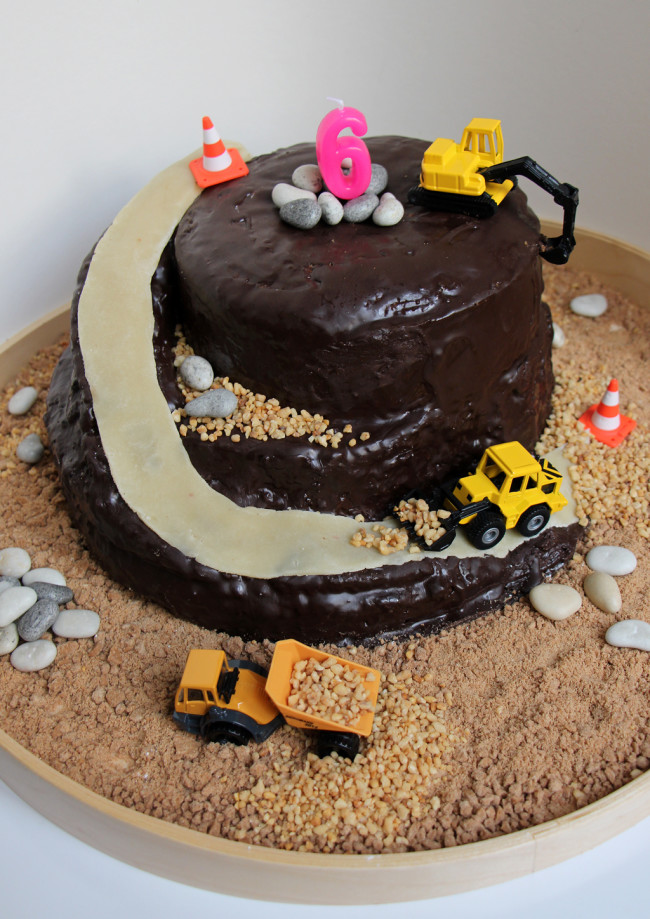
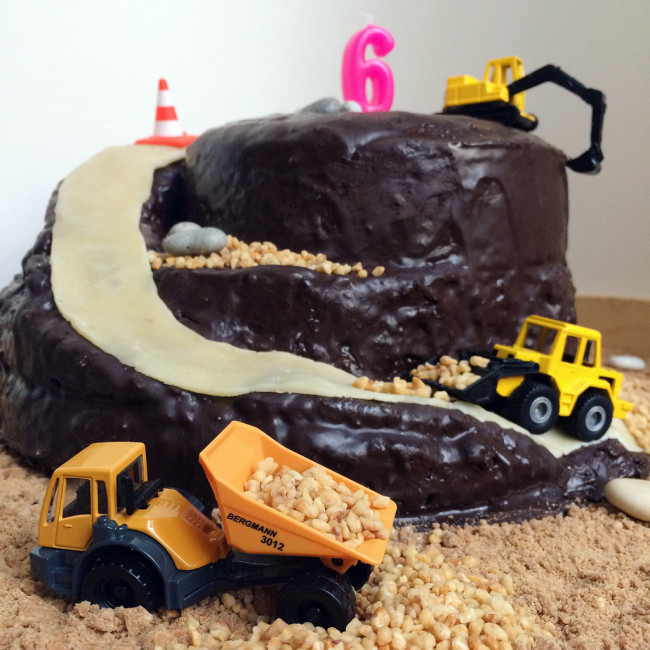
Step 7: Position the toy construction site vehicles, and any other extras you are adding. We added the toy traffic cones at the top and bottom of the ramp, little piles of liquorice ‘boulders’ scattered around the construction site, and added the Haselnusskrokant on the ledge half way up the ramp, at the bottom of the ramp, and around the construction vehicles to make it look like they were clearing the ‘gravel’.
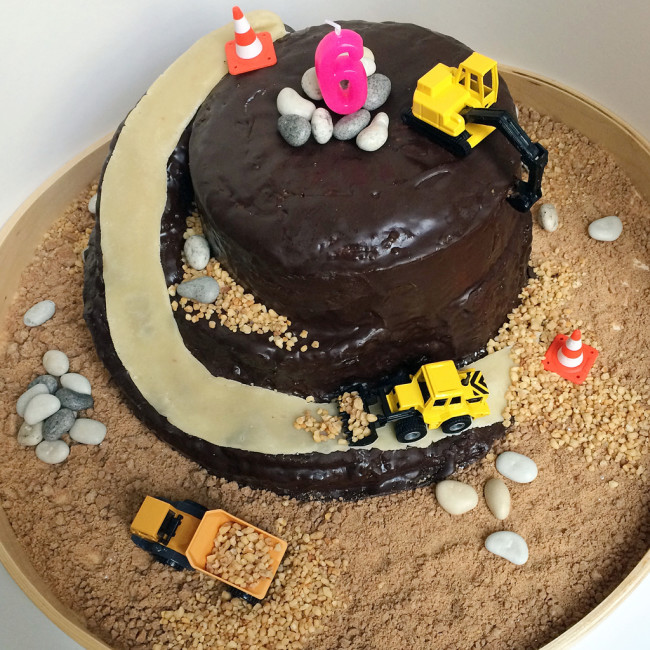
And, of course, it being a birthday cake we also added a candle right on the top of the cake (surrounded by some liquorice boulders, of course).
It took quite a bit of work, but it was also heaps of fun making this together for our boy, and the moment he saw his cake and his eyes lit up were totally worth it all. Happy birthday, precious boy! Six at last!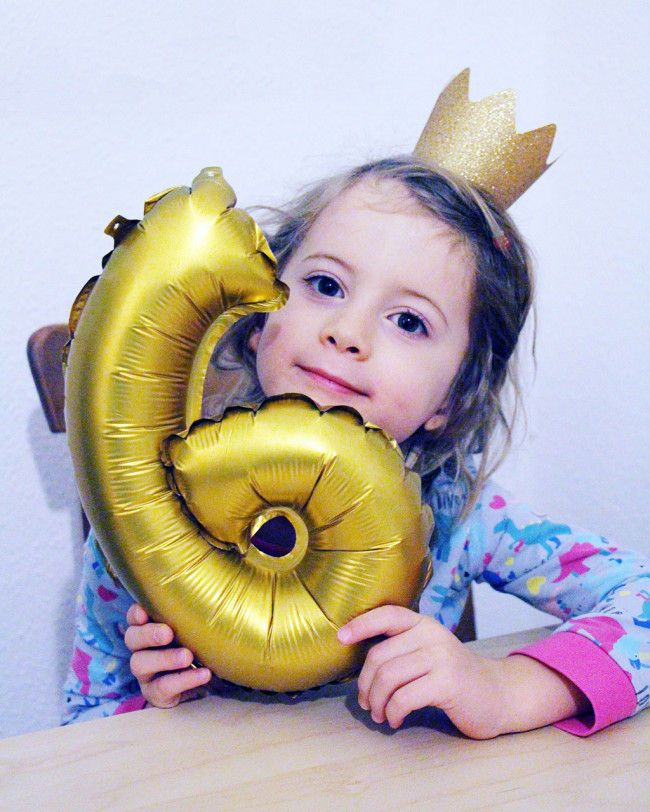
Pingback: Review: Construction Cars Set – The Bear & The Fox
Pingback: Hooray for Hat! Birthday Cake Decor – The Bear & The Fox