Rainbow Unicorn Cake
Last week was my elder son’s 7th birthday, and he had asked for a unicorn theme and cake. I found loads of unicorn cakes floating around Pinterest, when I was looking for inspiration, which were either flat topped, e.g. using a sandwich cake tin, or involved a lot of carving. Then I came across a unicorn cake on the Lakeland blog, using one of their hemisphere cake tins to give a perfectly round unicorn cake. Even better, it came with a complete step-by-step tutorial. I knew I had found my cake!
The tutorial claims that it “really is much simpler than you might think”, and yes, while it was time consuming – it took me two days, including time for cooling and setting in between steps – it was fairly straight forward as long as you followed the tutorial closely. Visually it’s possibly the most stunning cake I’ve made to date, technically I’ve made some that have been way more challenging. While all credit for the tutorial goes to Lakeland, I thought I’d document my own efforts here.
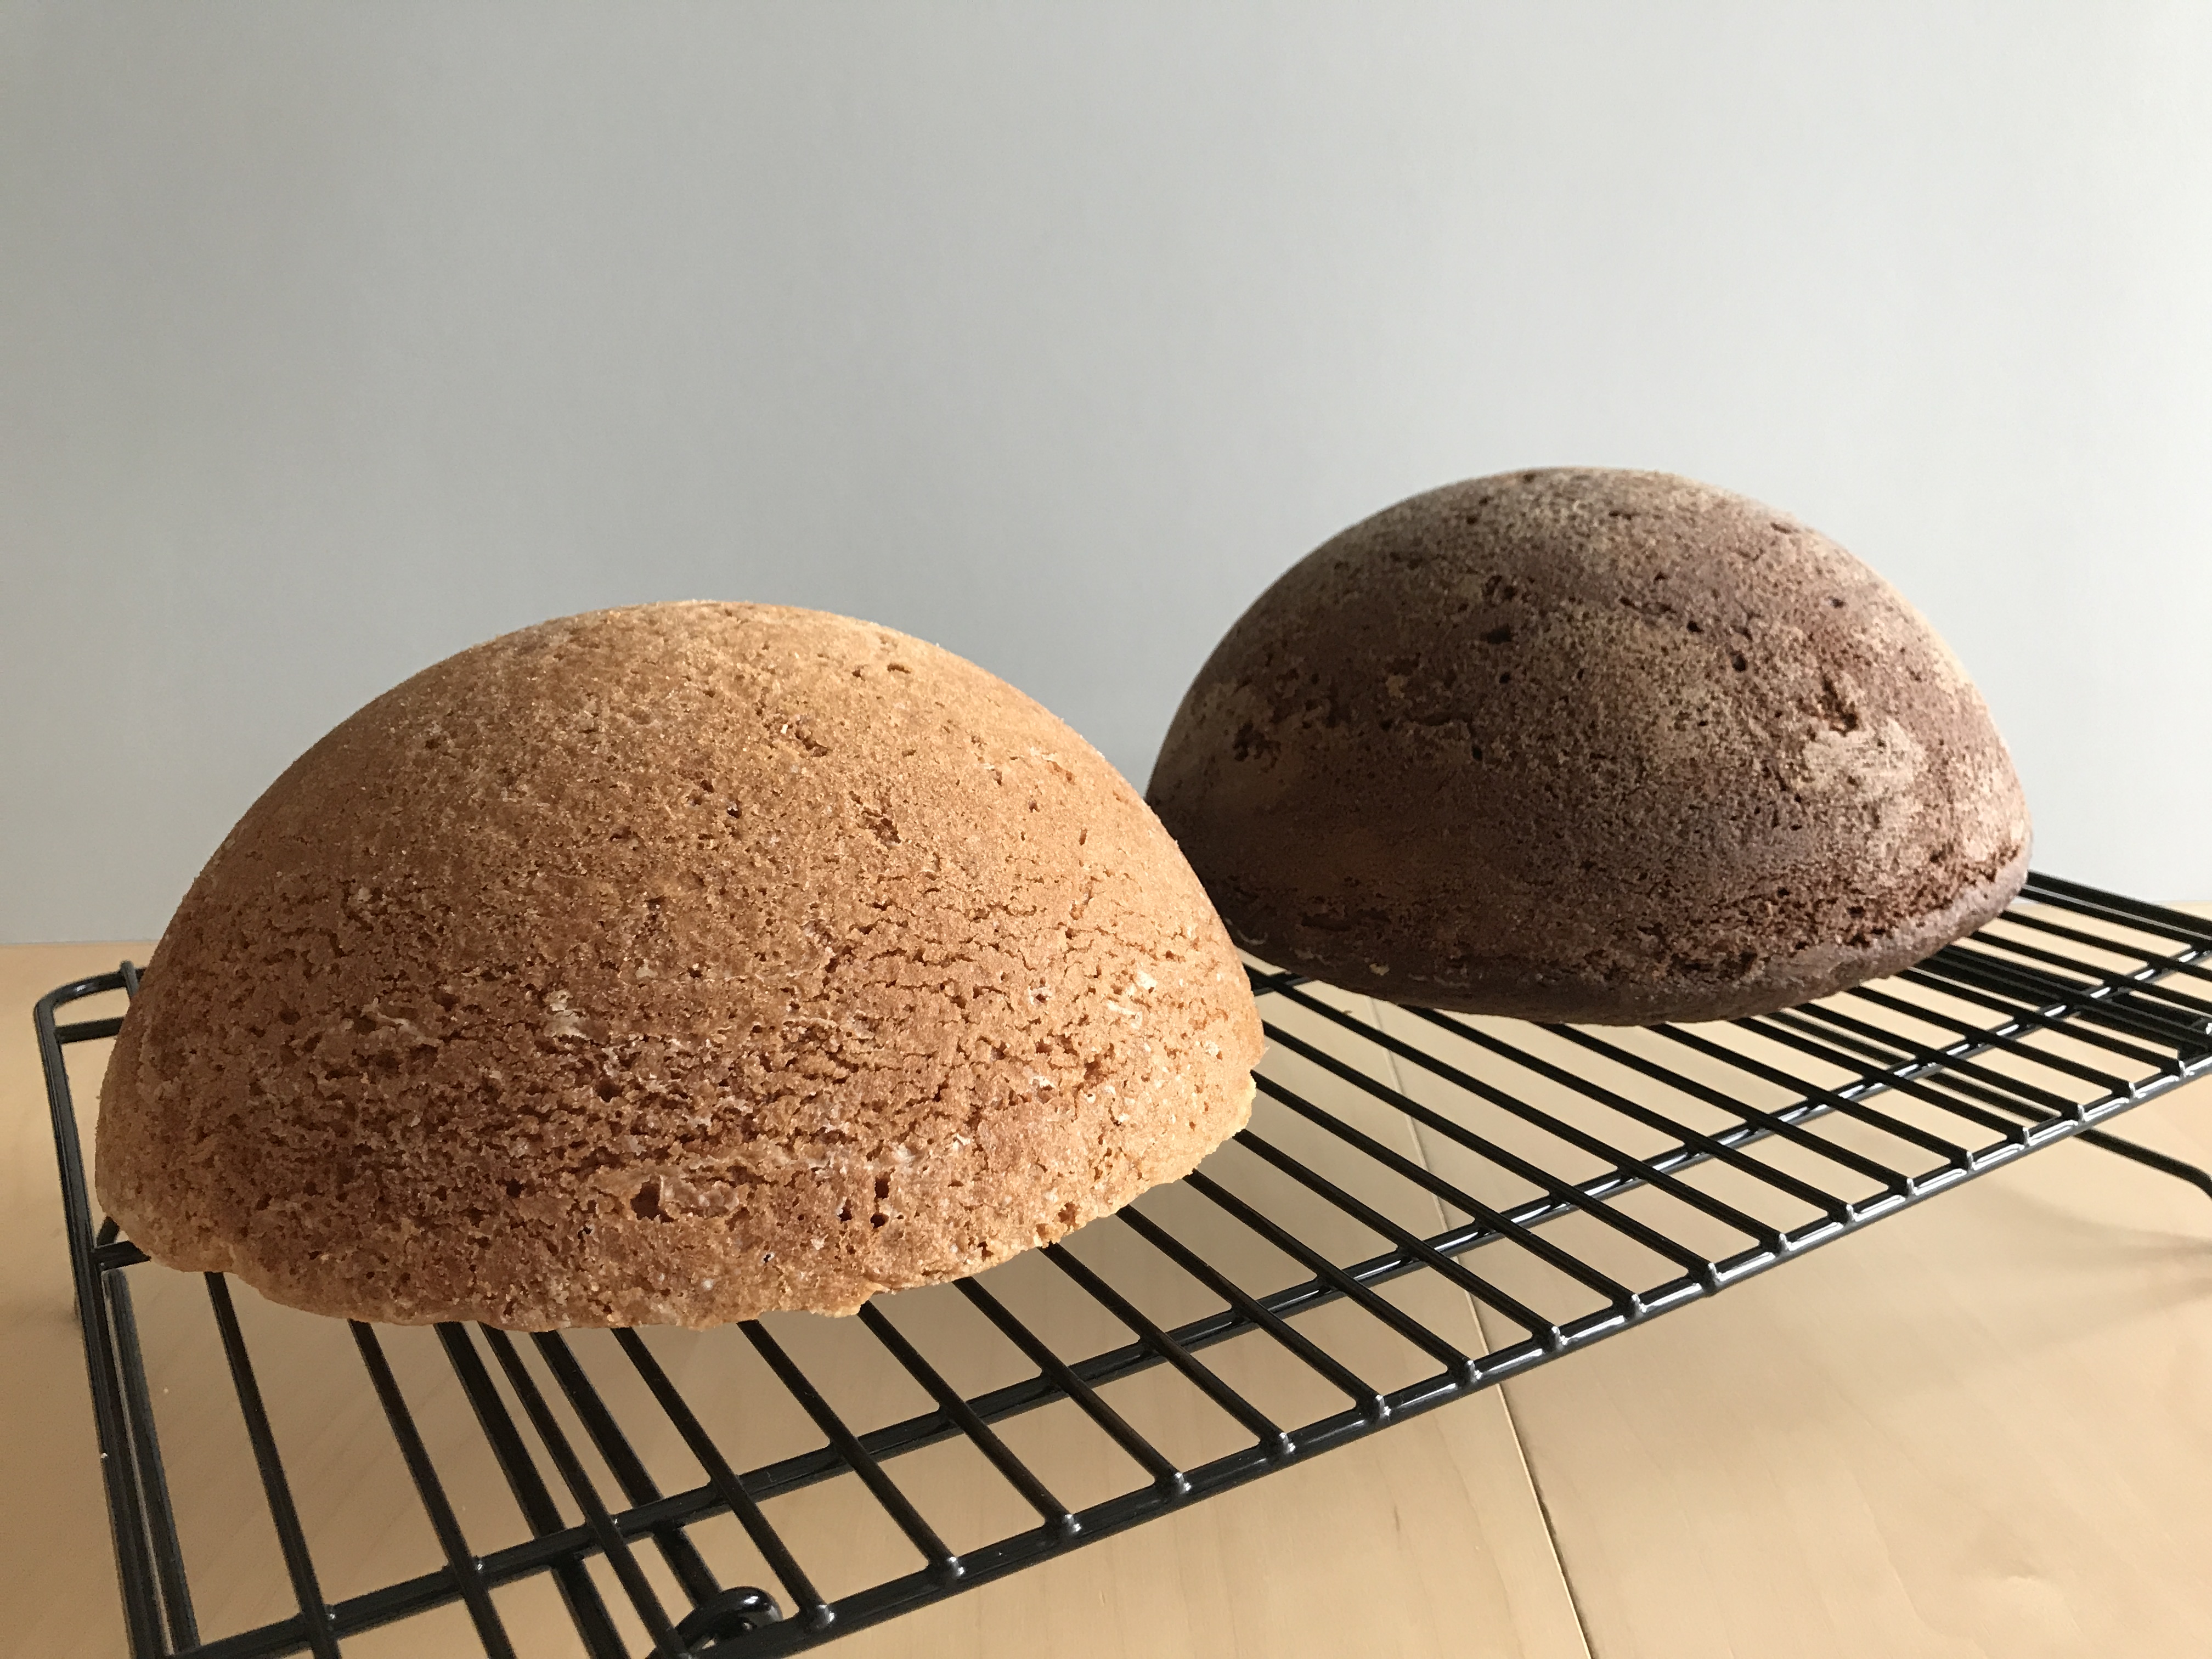
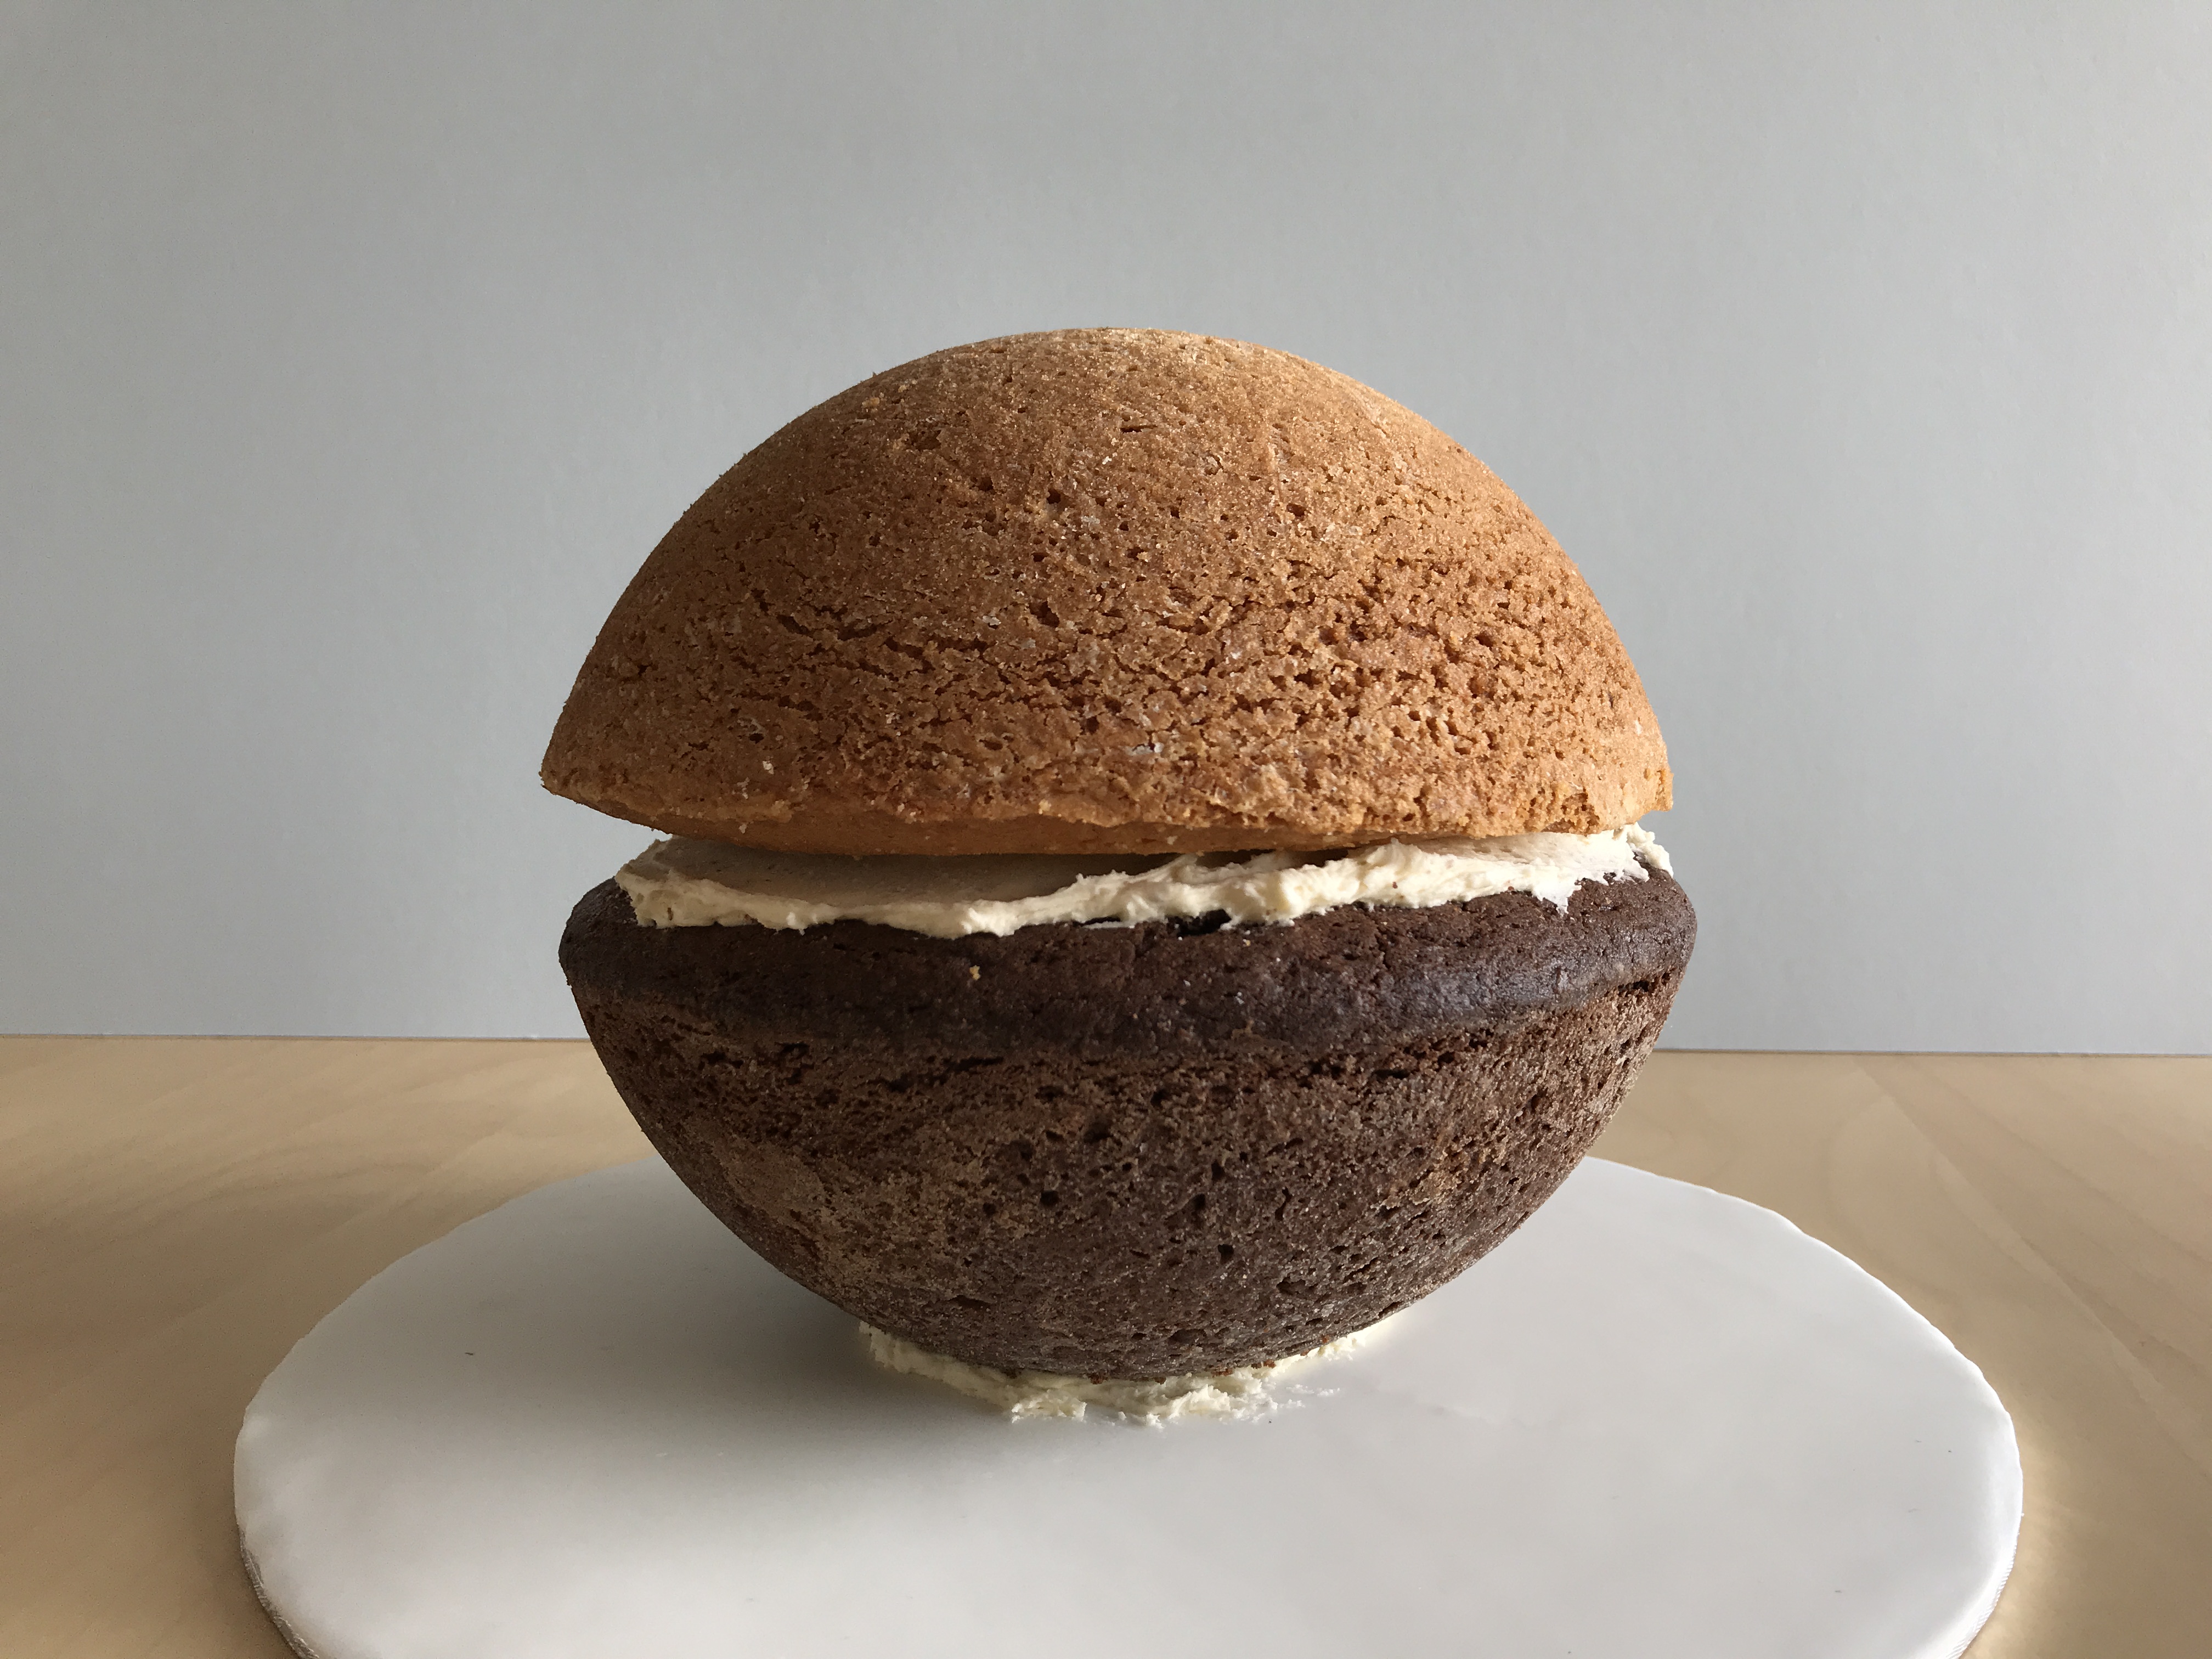
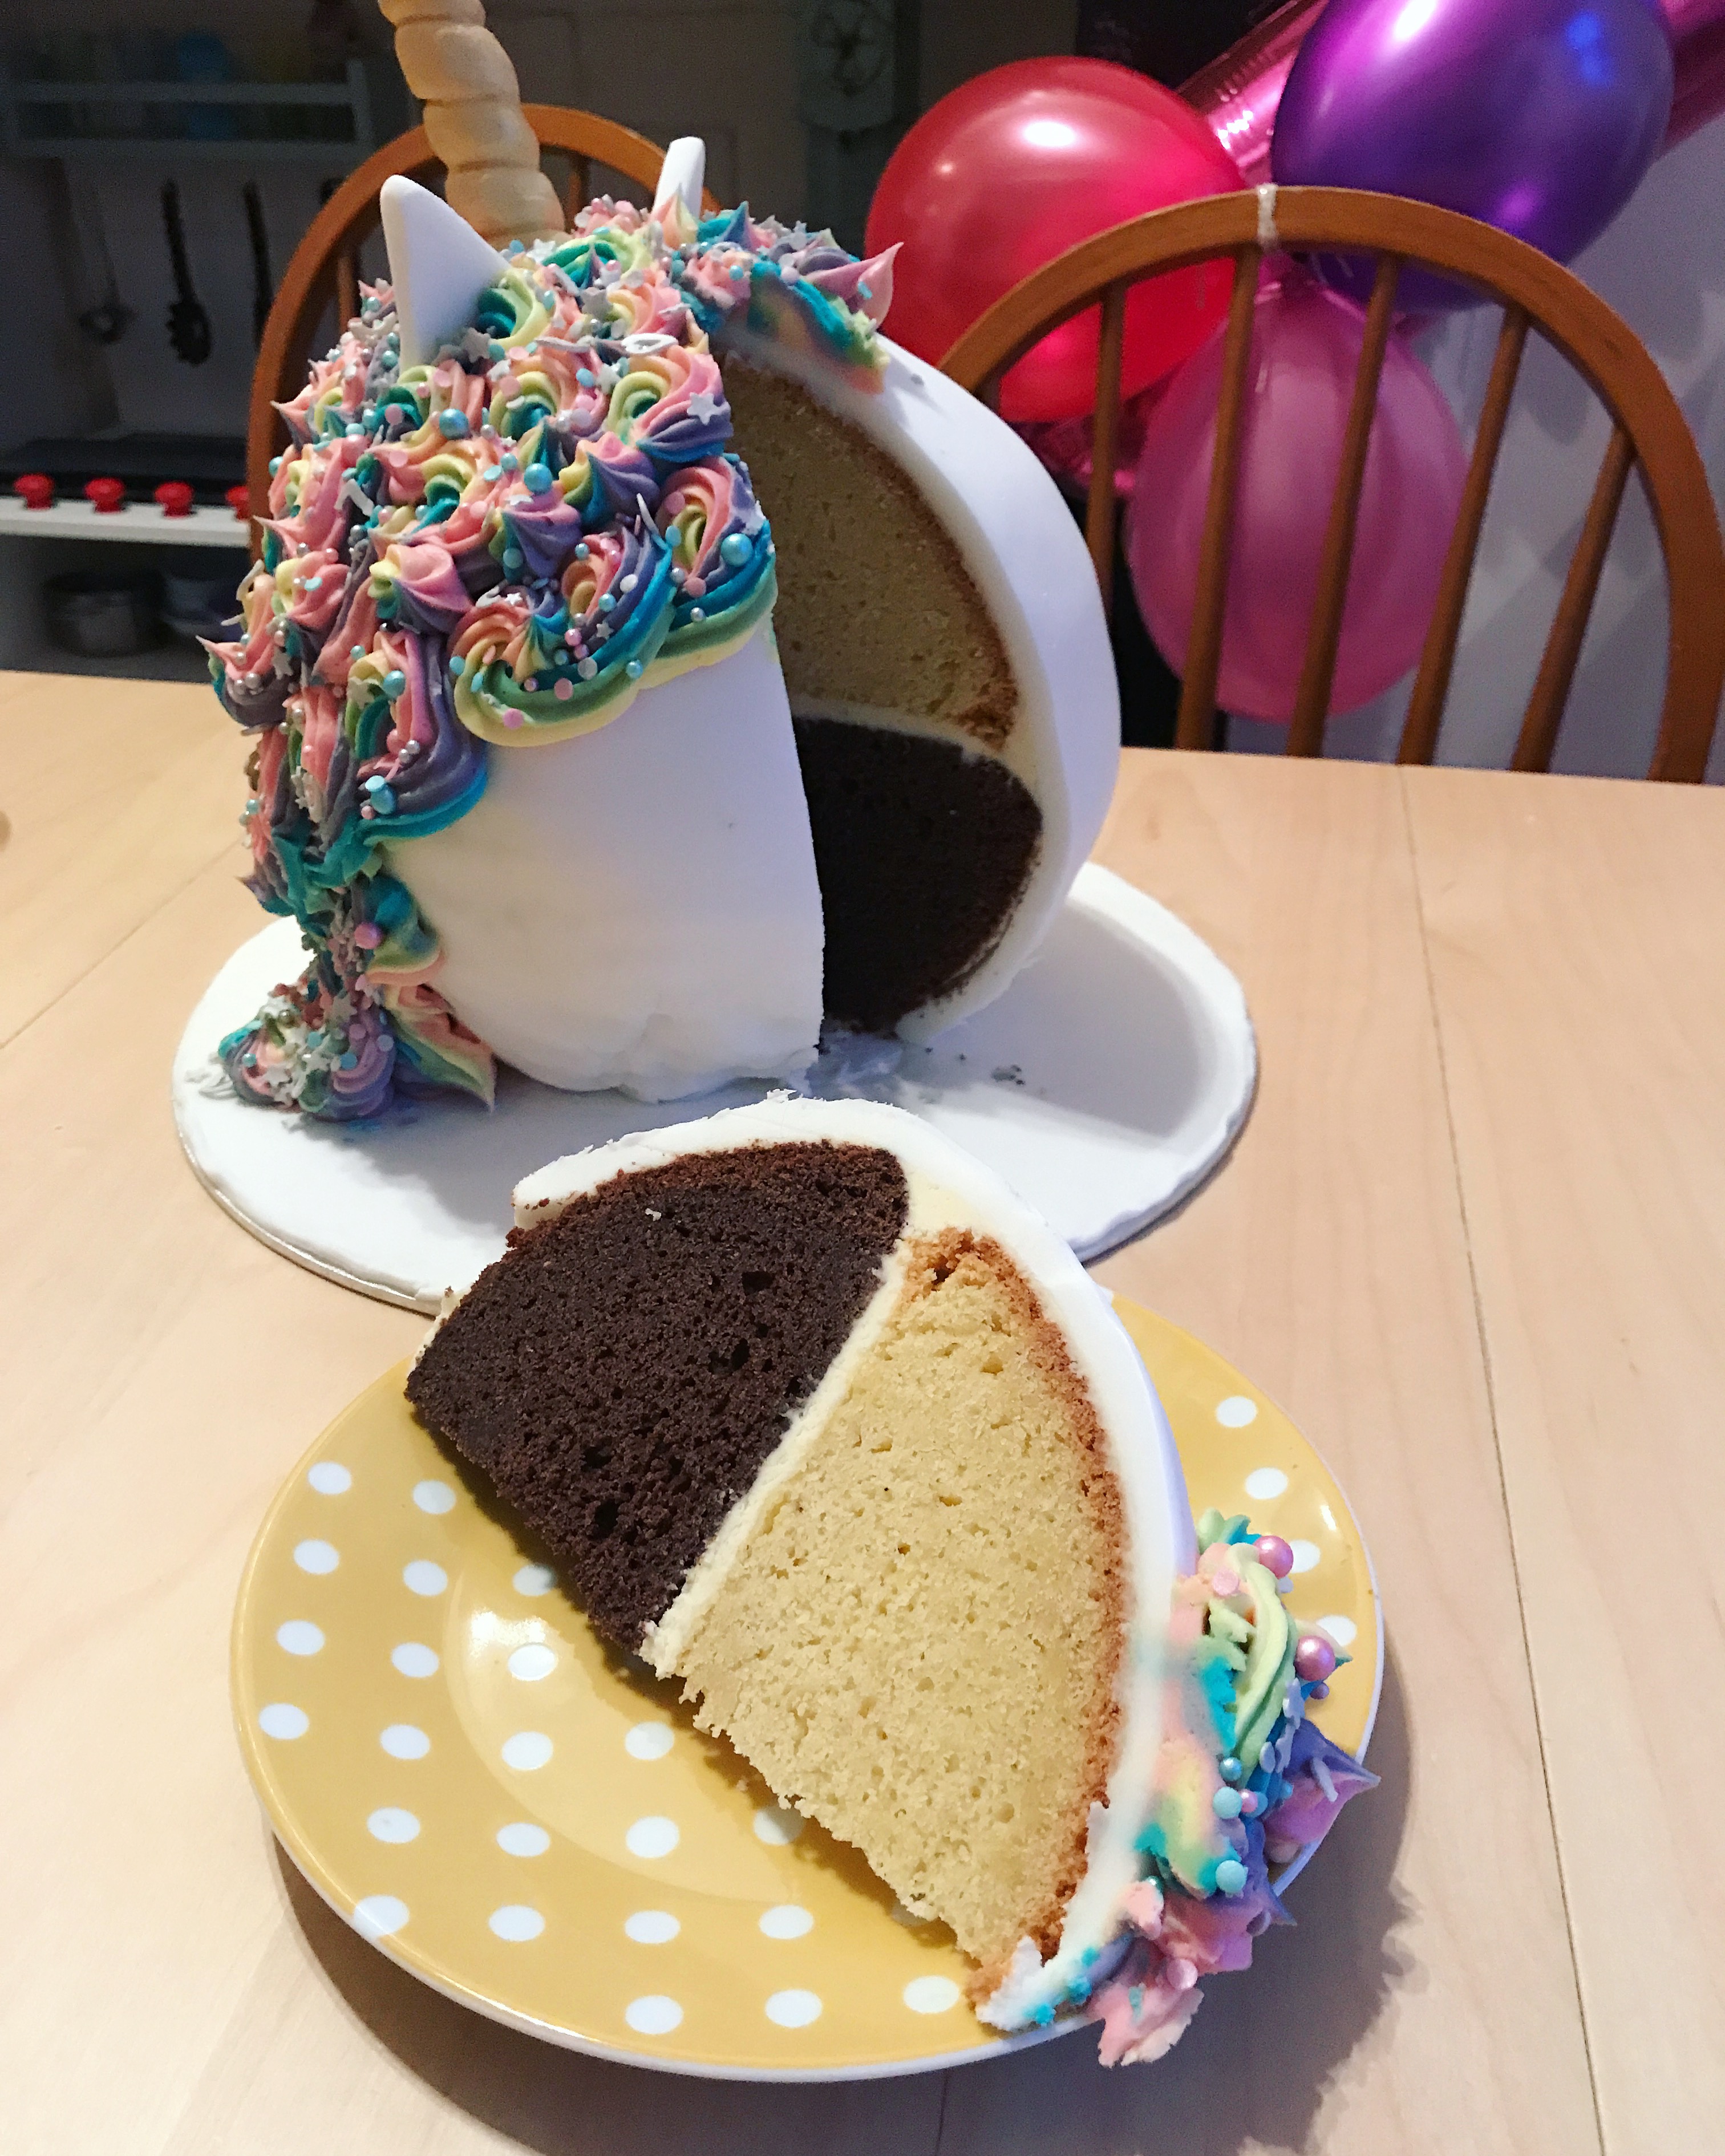
Step 1: Bake the cake! I didn’t use Lakeland’s cake recipe, but instead used my own gluten free lemon drizzle cake recipe. Oskar had requested vanilla AND chocolate, so I made one half in each flavour. The original tutorial used two of Lakeland’s large hemisphere cake tins, but since I had only bought one, I baked the cakes one after the other. I substituted the lemon in my recipe for vanilla (I used a sachet of Dr Oetker Vanillin, but you can use vanilla essence instead), and for the chocolate I also added 2 heaped tablespoons on cocoa poweder, and 2 teaspoons of the pumpkin spice mix from my Pumpkin Spice Chocolate Cupcakes. For the cakes to fill the tin, I had to double the quantities for each. I baked the cakes on Day 1, one in the morning and one in the afternoon.
Step 2: Cover a large enough cake board with ready-to-roll white icing and stick it in the fridge to harden.
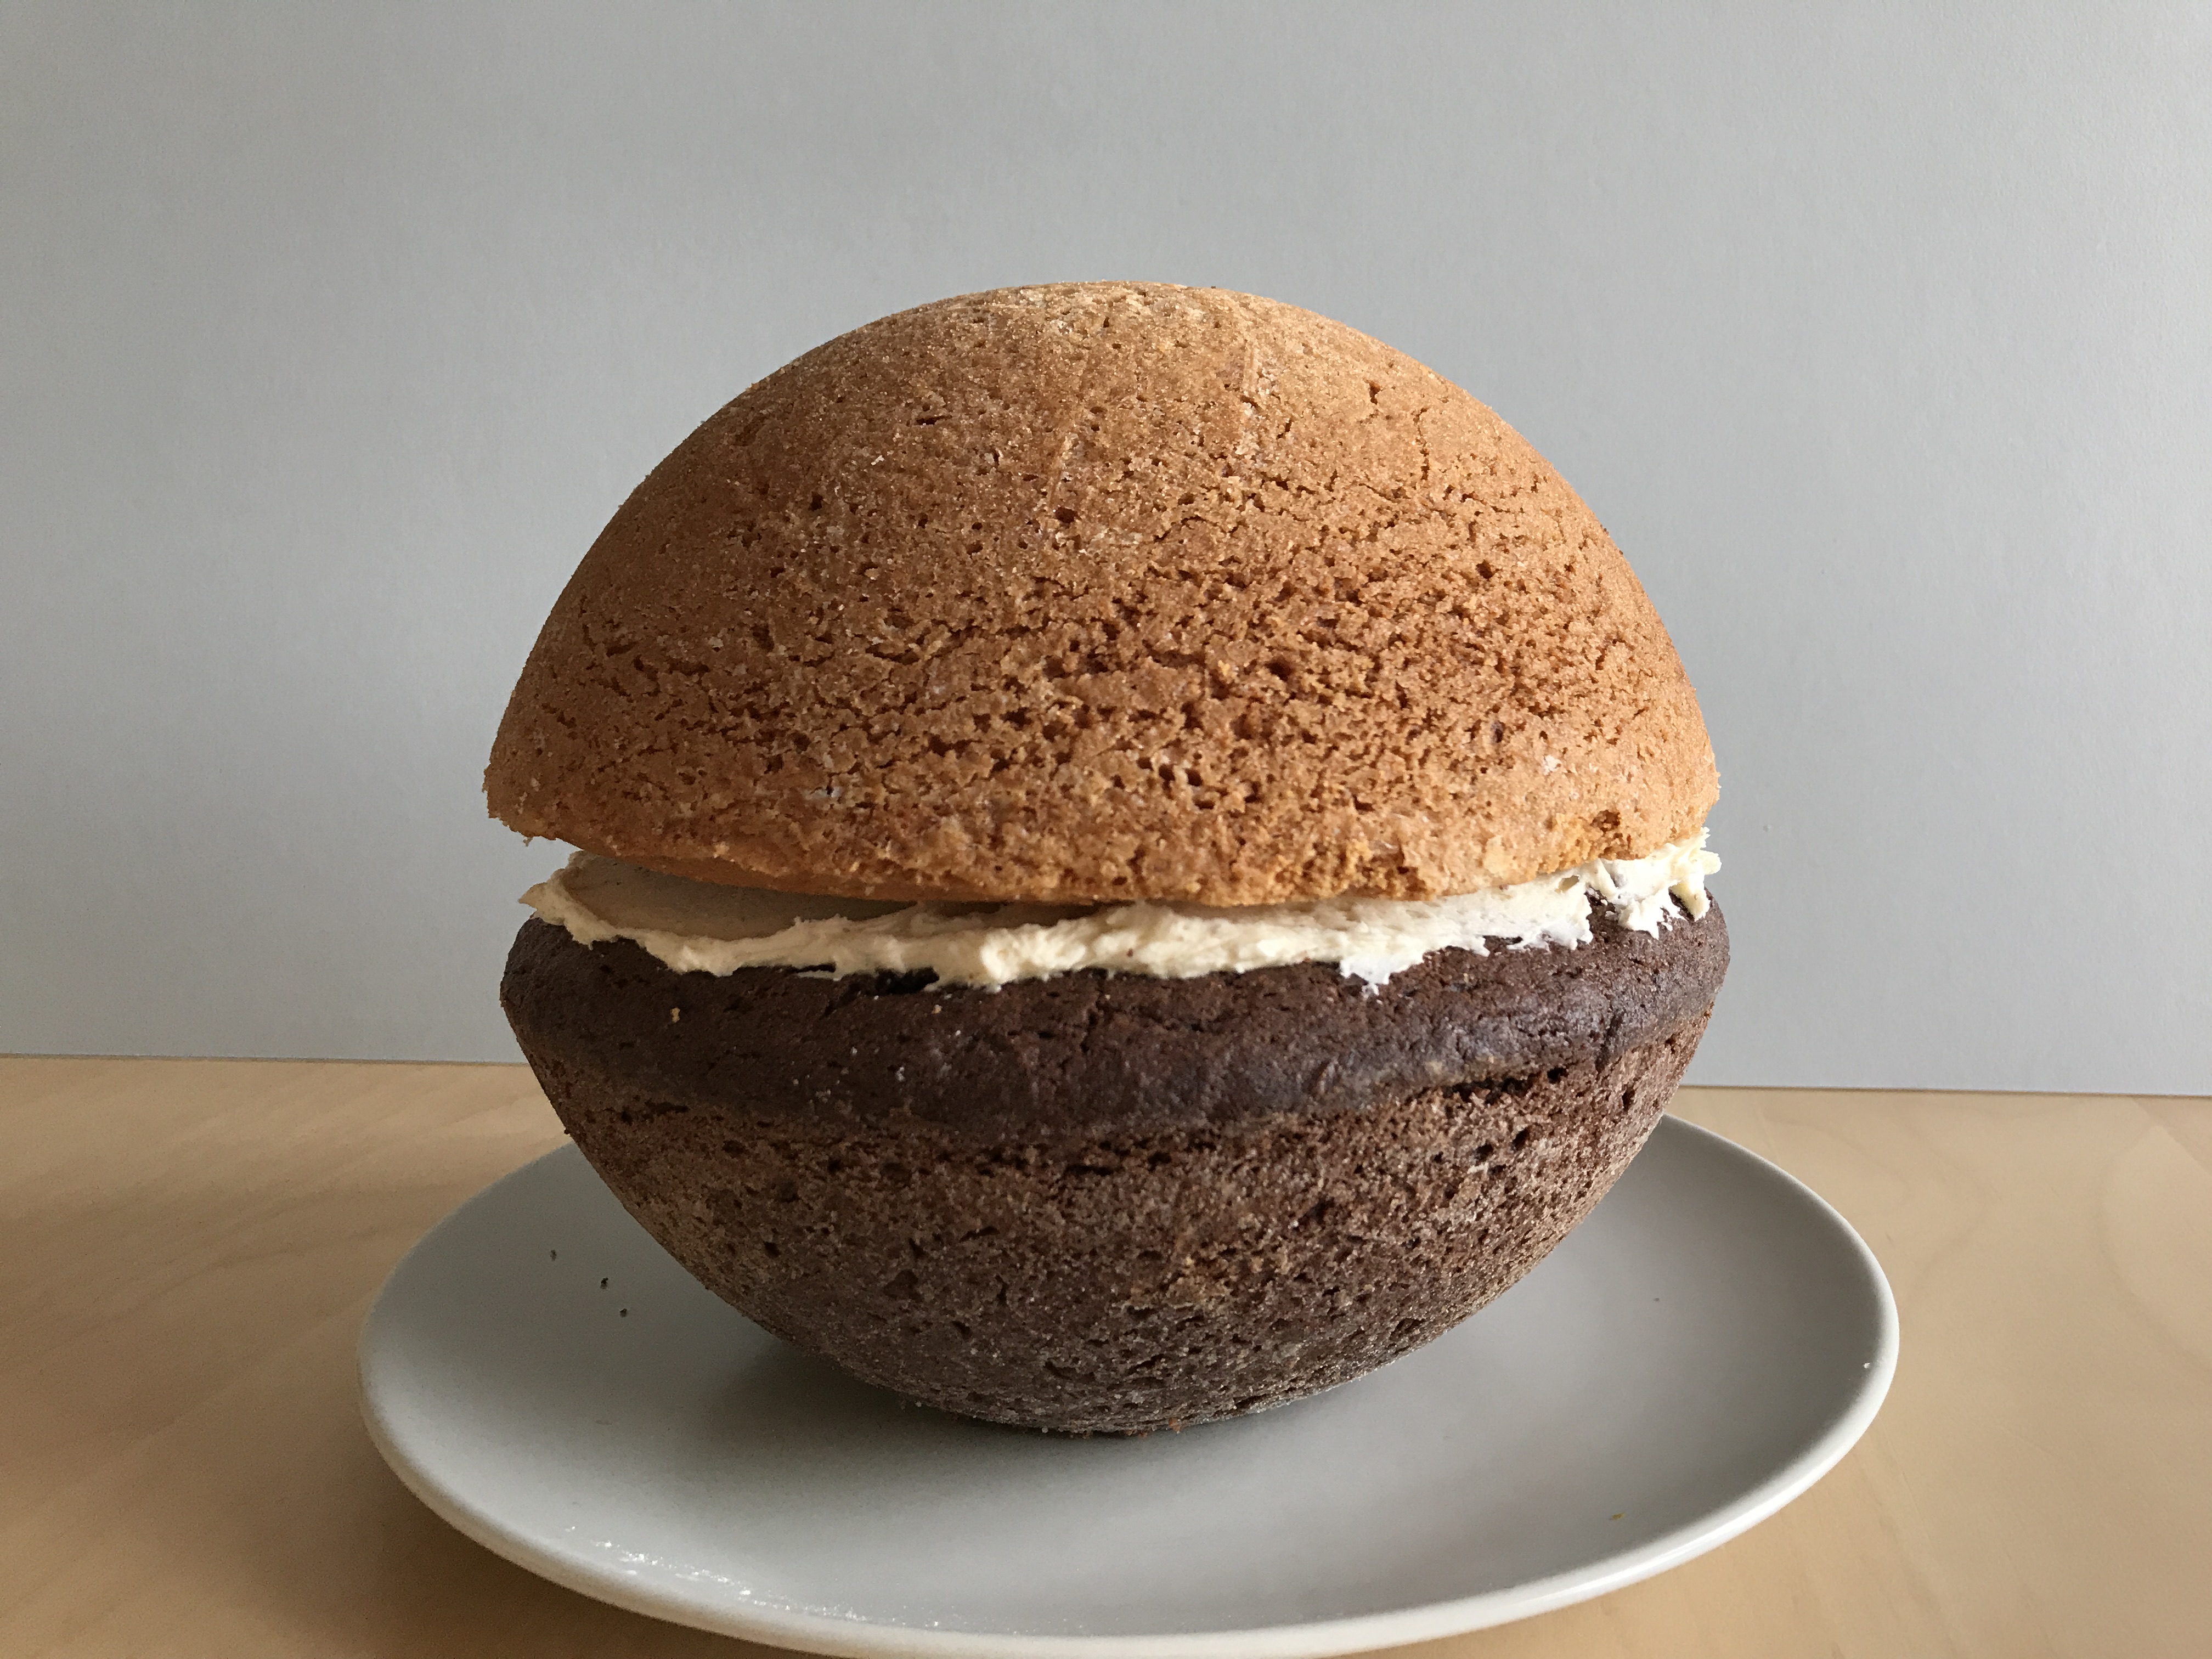
Step 3: Once the cakes are fully cooled, sandwich the two halves together with butter cream. I used the butter cream recipe in the Lakeland tutorial for this, and I had to shave the top of each cake to flatten them out a bit, as they had domed during baking. The original tutorial says to also cut each cake horizontally and spread it with a layer of jam and buttercream, but gluten free cake is much more fragile so I skipped this step. I also left out the jam altogether.
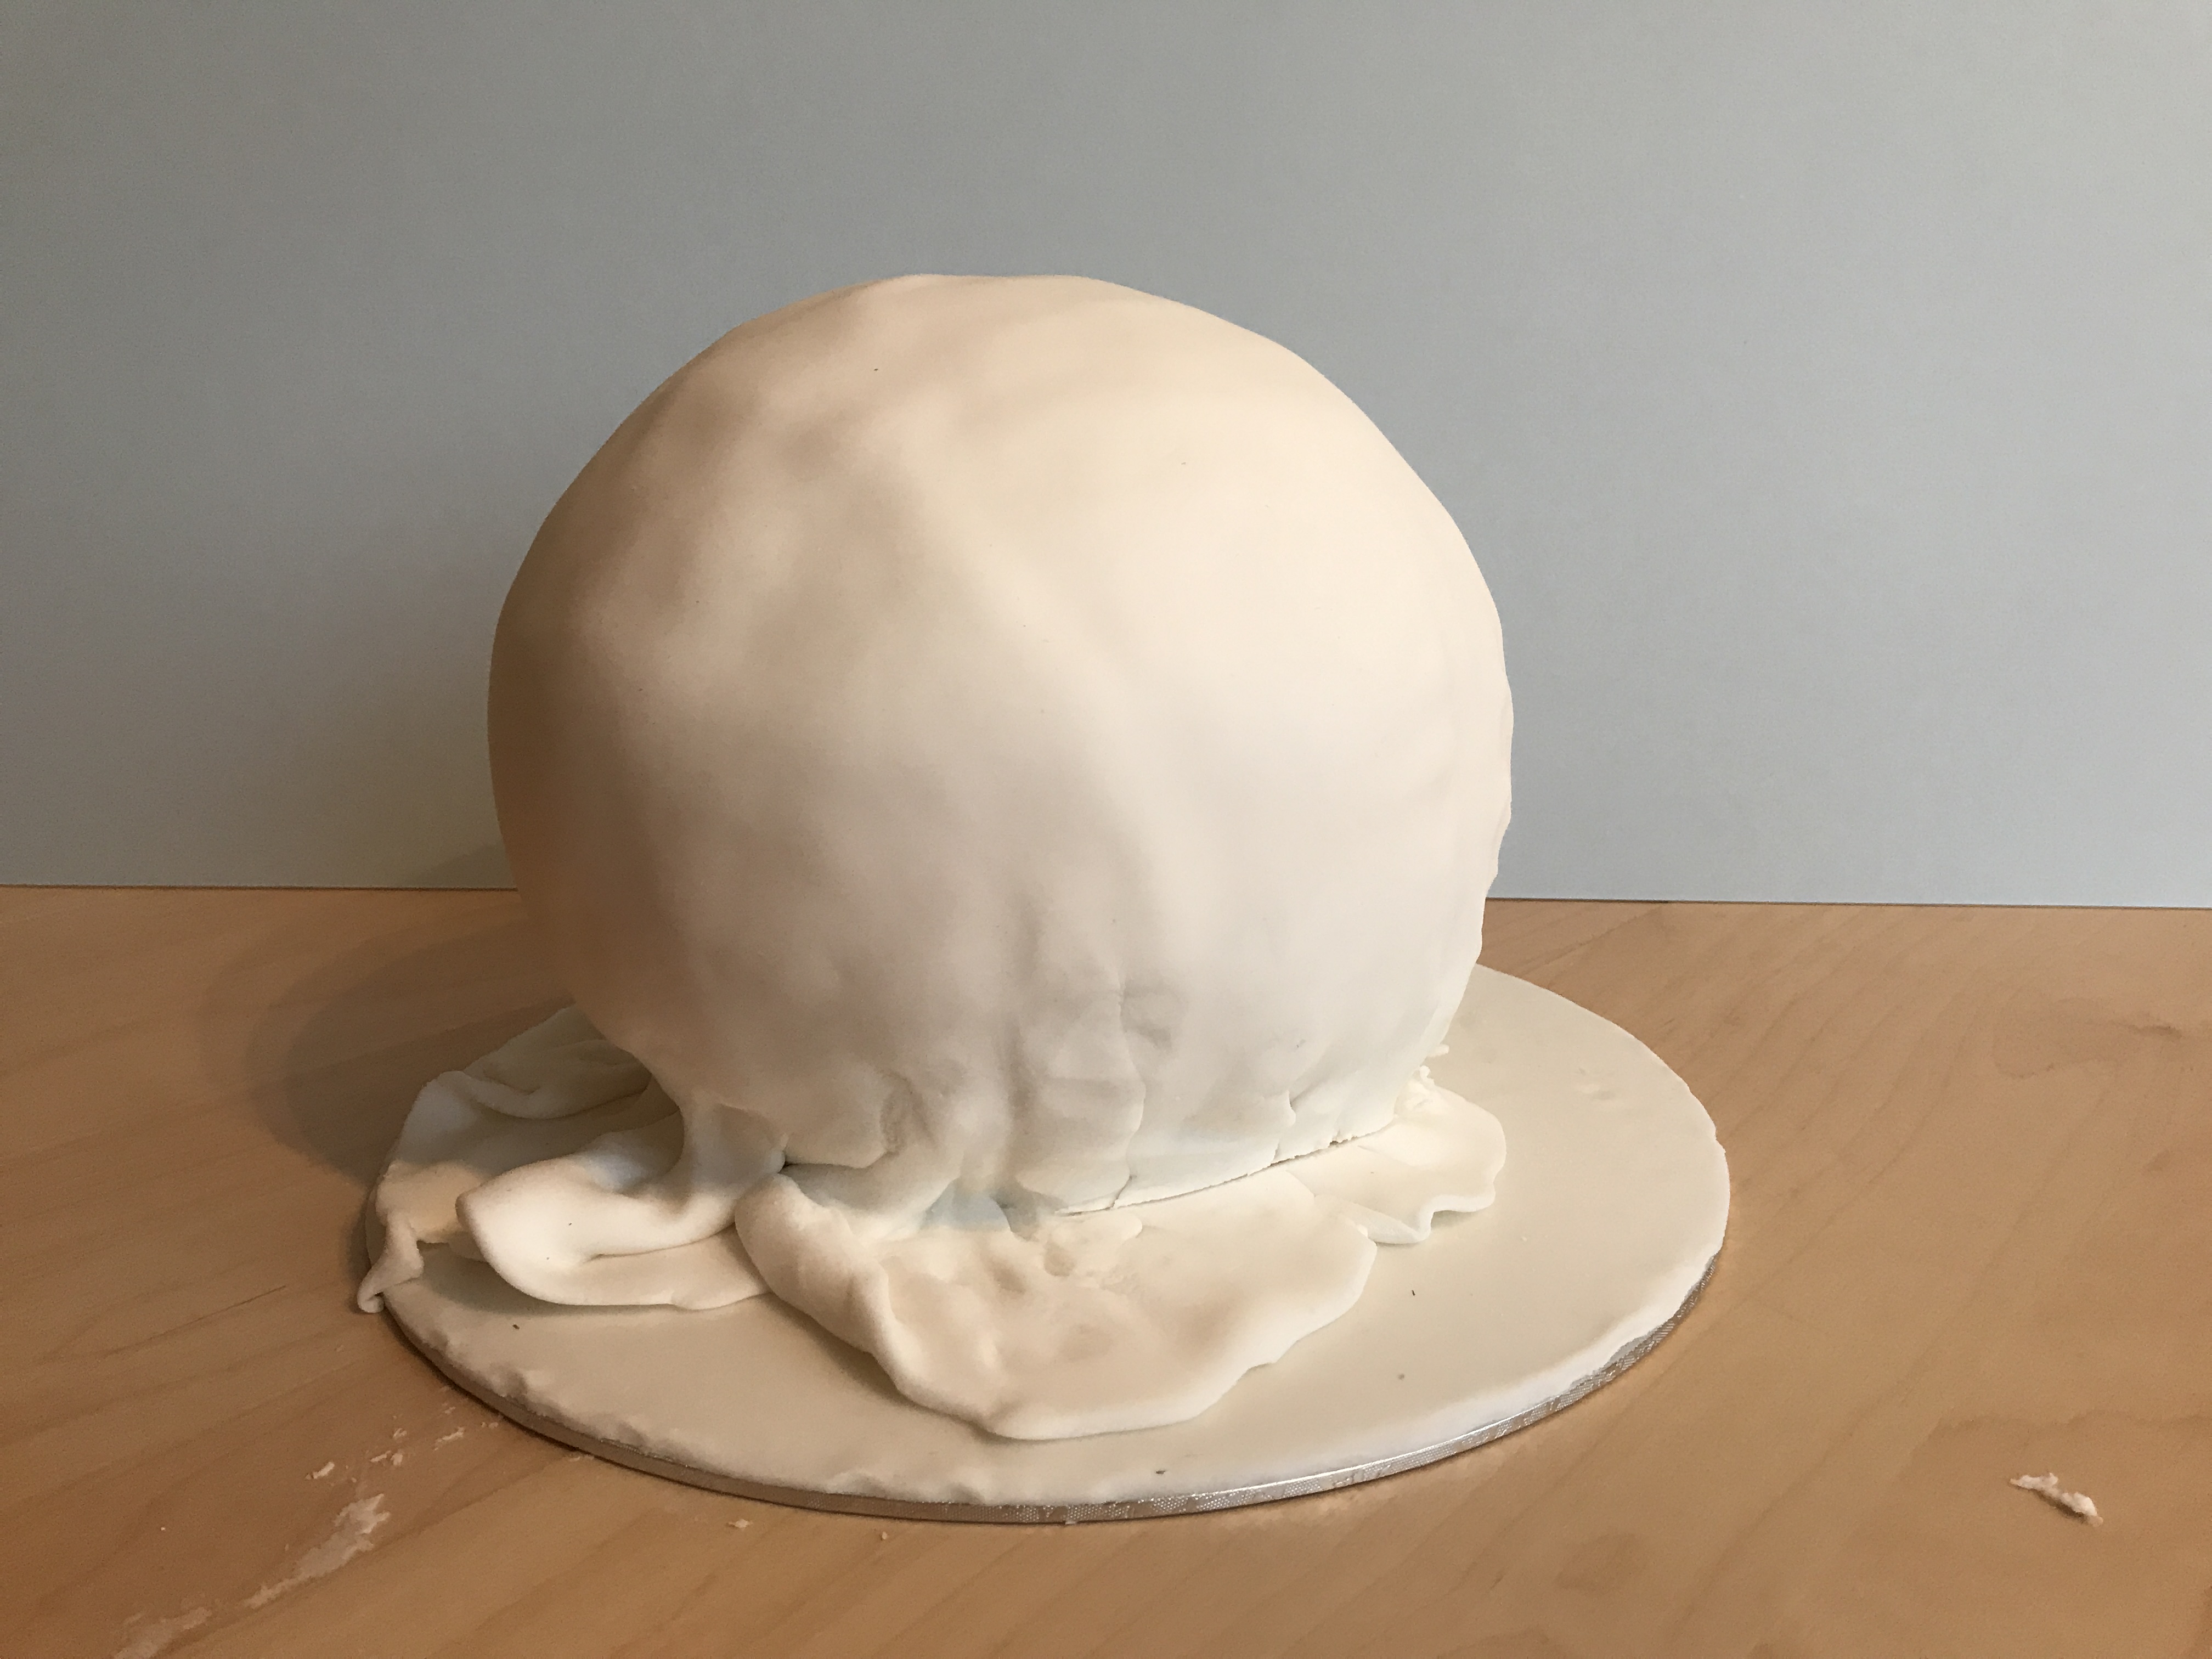
Step 4: Attach the cake to your cake board. I trimmed a bit off the bottom of the cake, and stuck it to the cake board with some more butter cream.
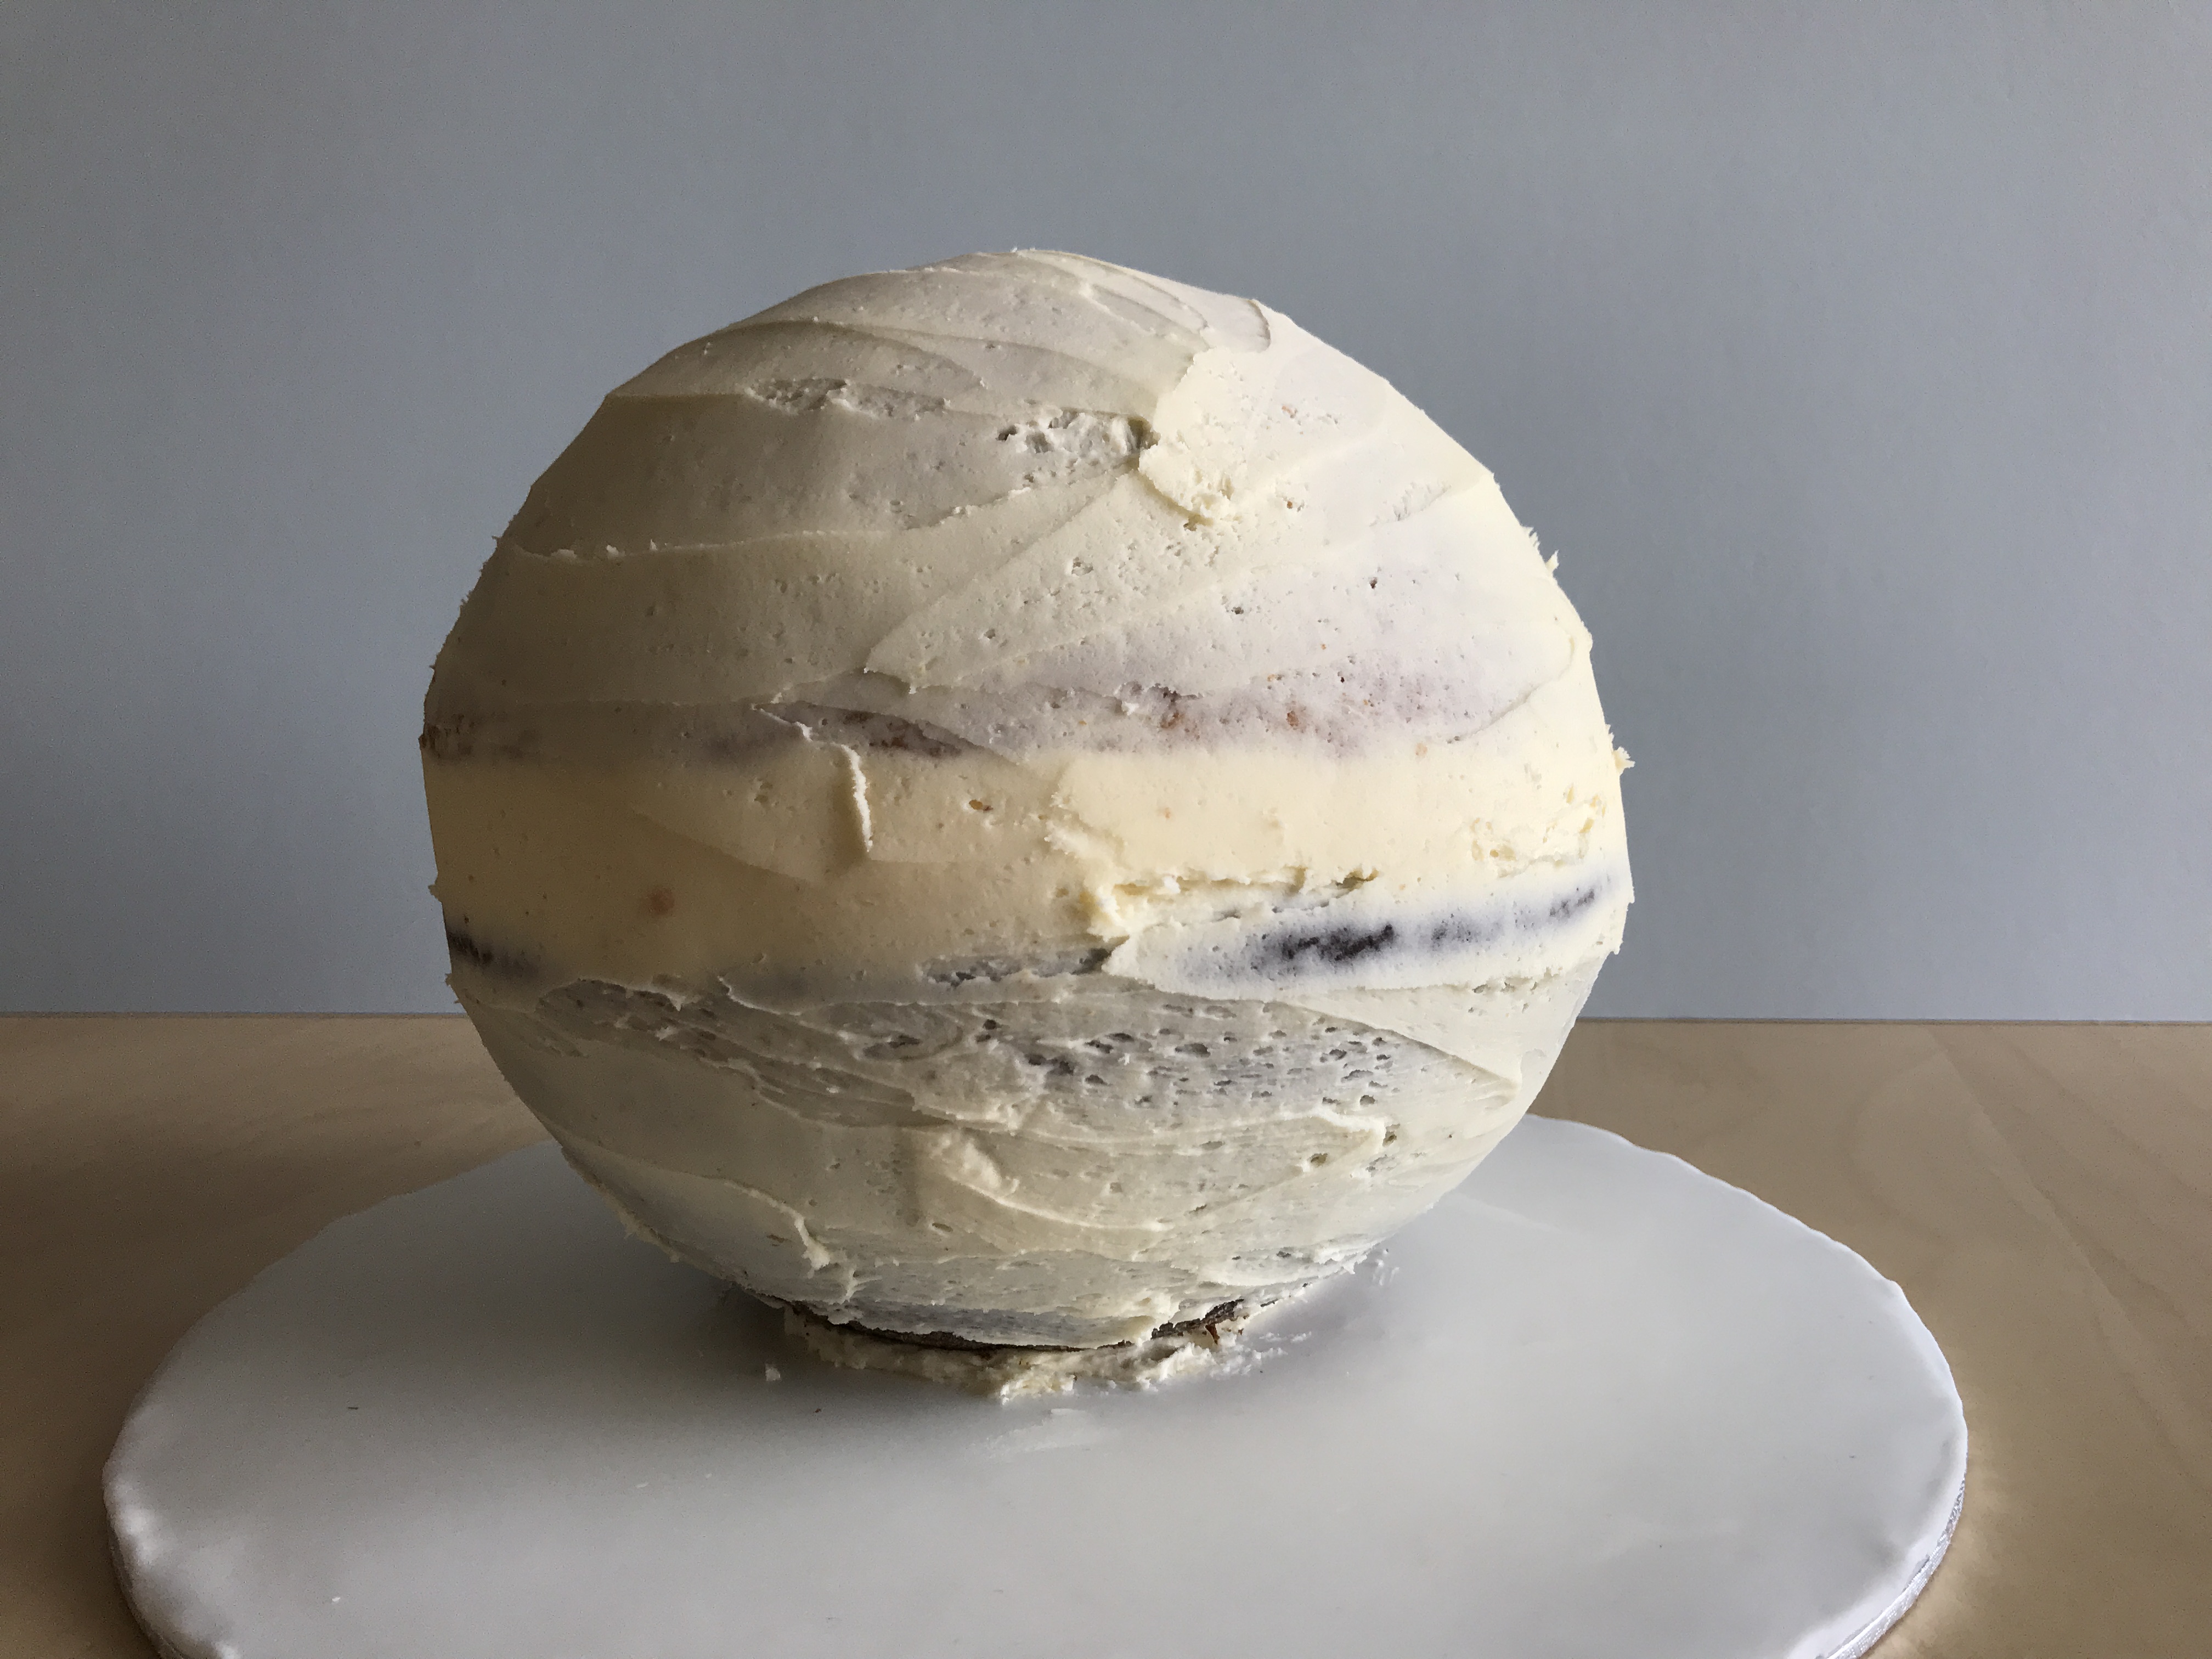
Step 5: Cover the cake with a thin coat of buttercream and stick it in the fridge for at least an hour to harden.
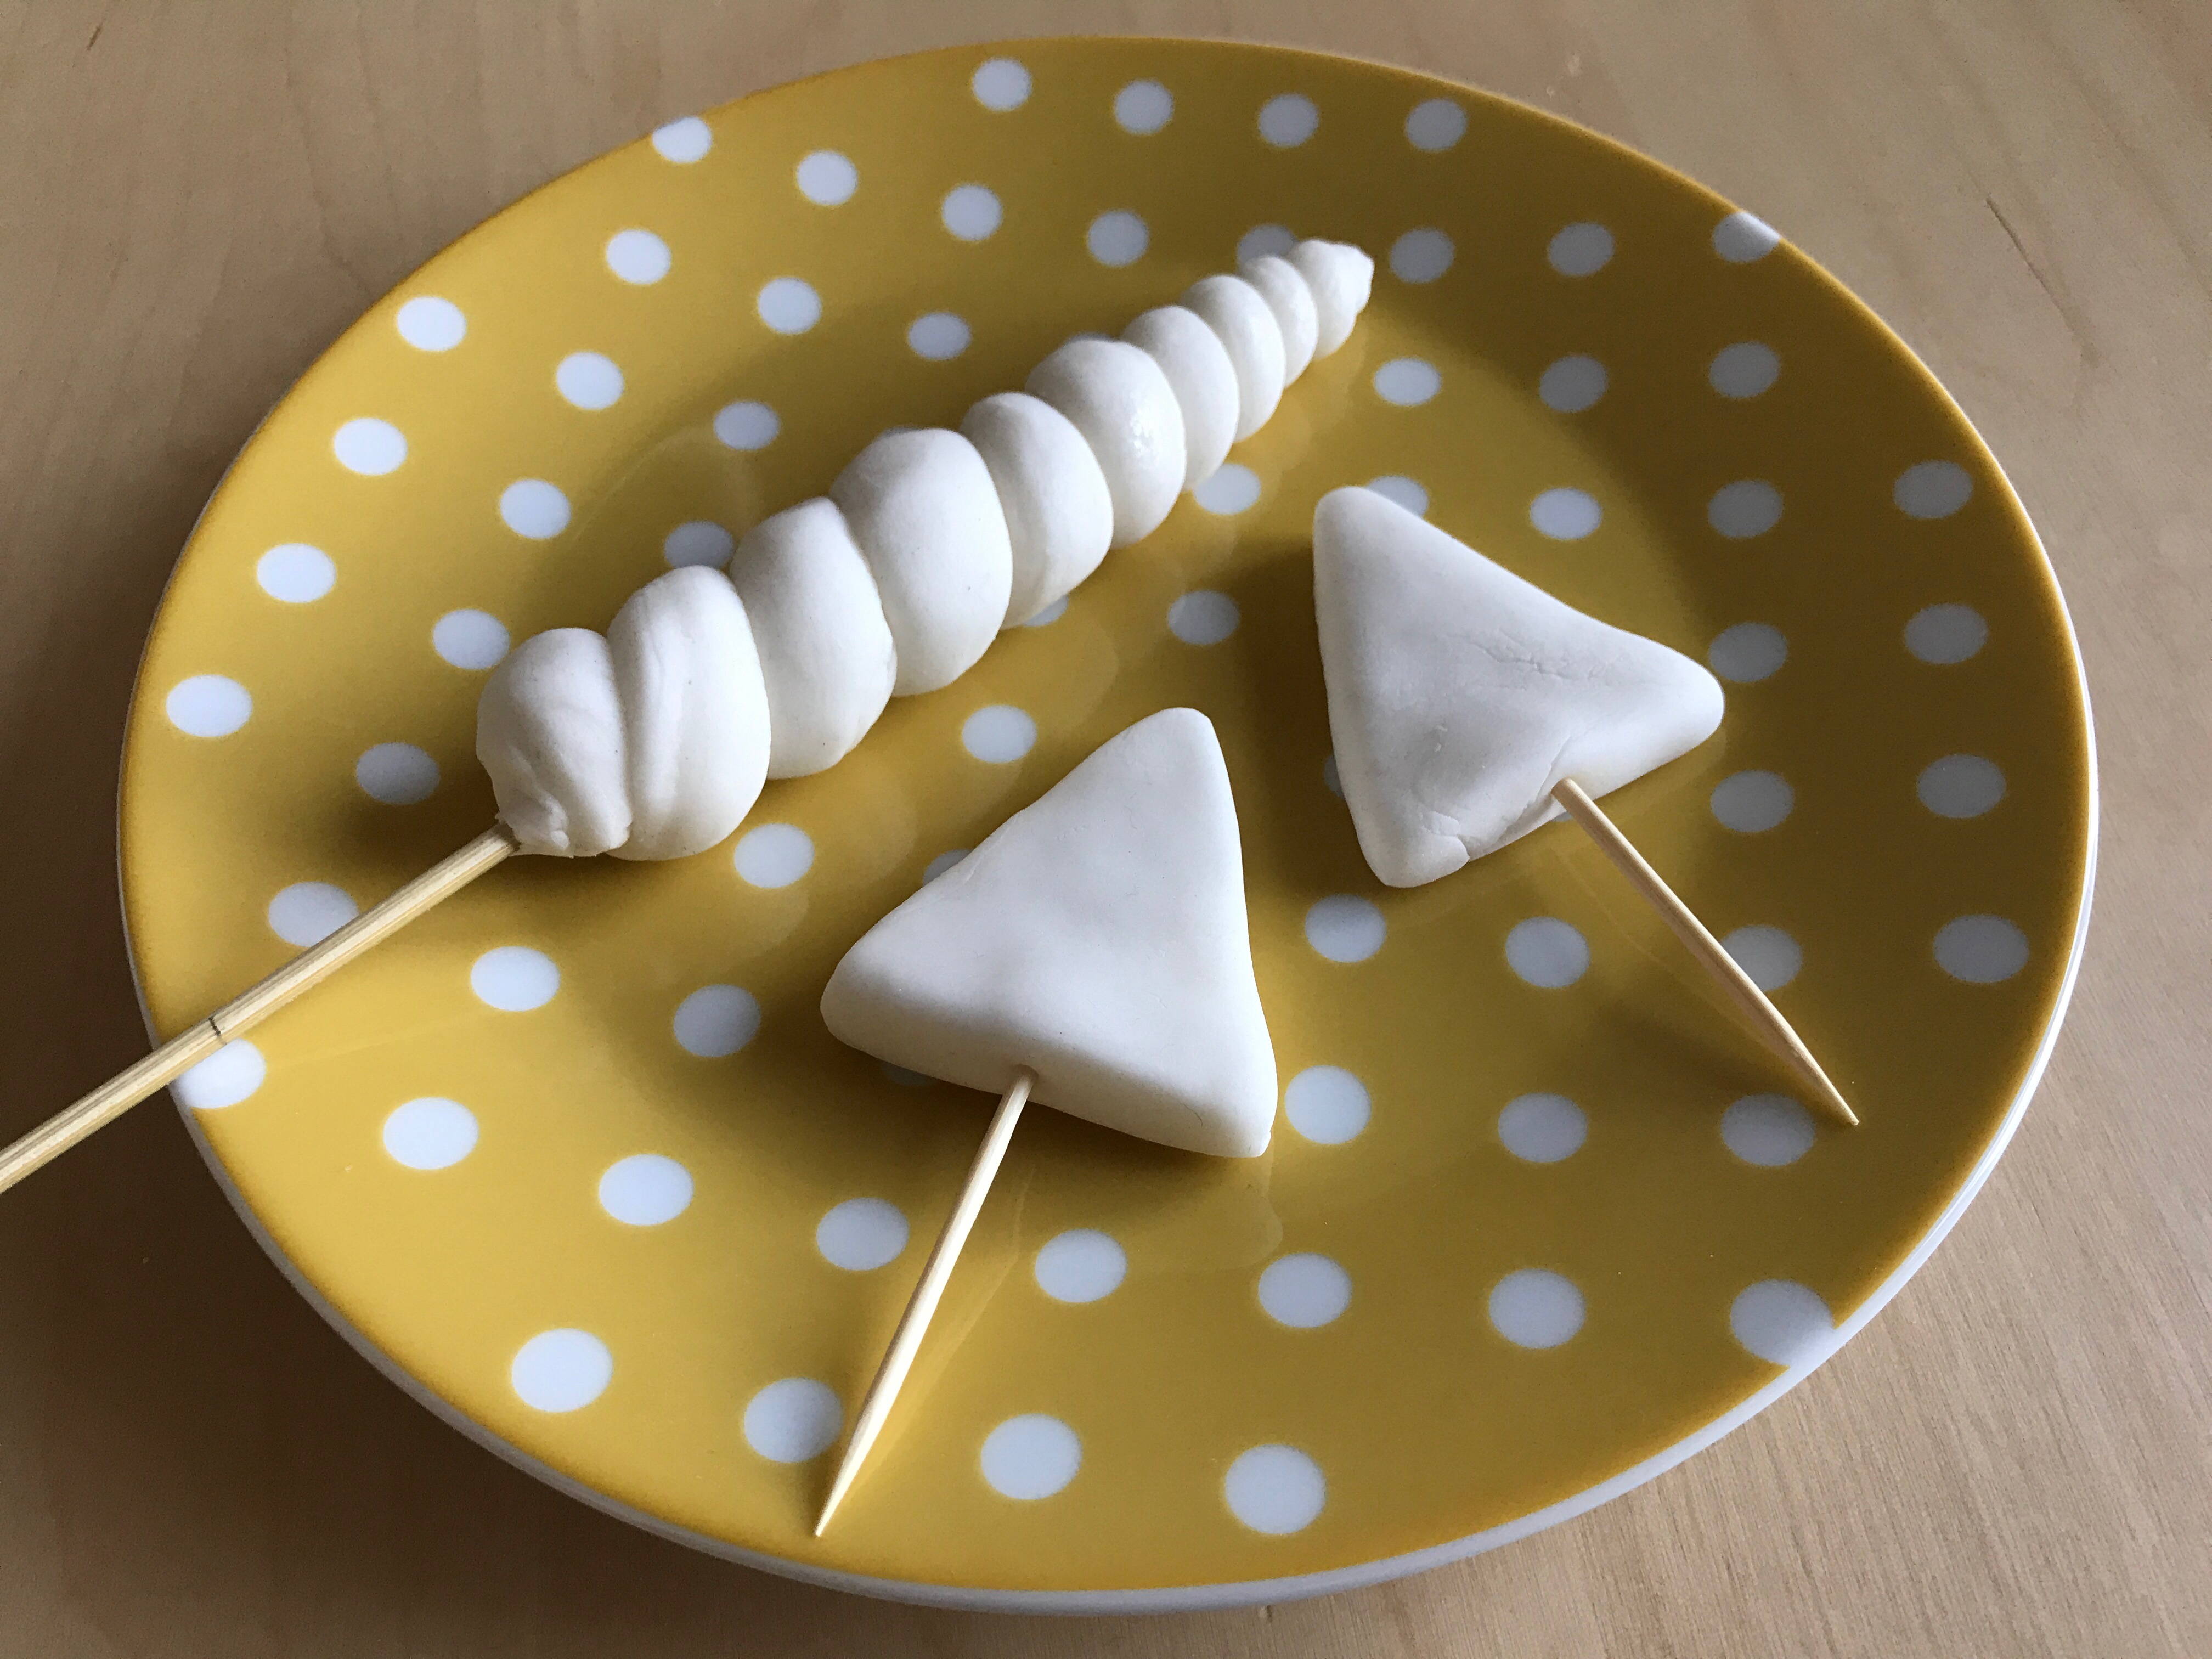
Step 6: Make the horn and ears. Whilst the cake was in the fridge, waiting for the buttercream to set, I made the horn and ears out of modelling icing, according to the tutorial. I added toothpicks to the ears, which wasn’t mentioned in the tutorial, to make them easier to attach later. Stick the horns and ears in the fridge too, to harden.
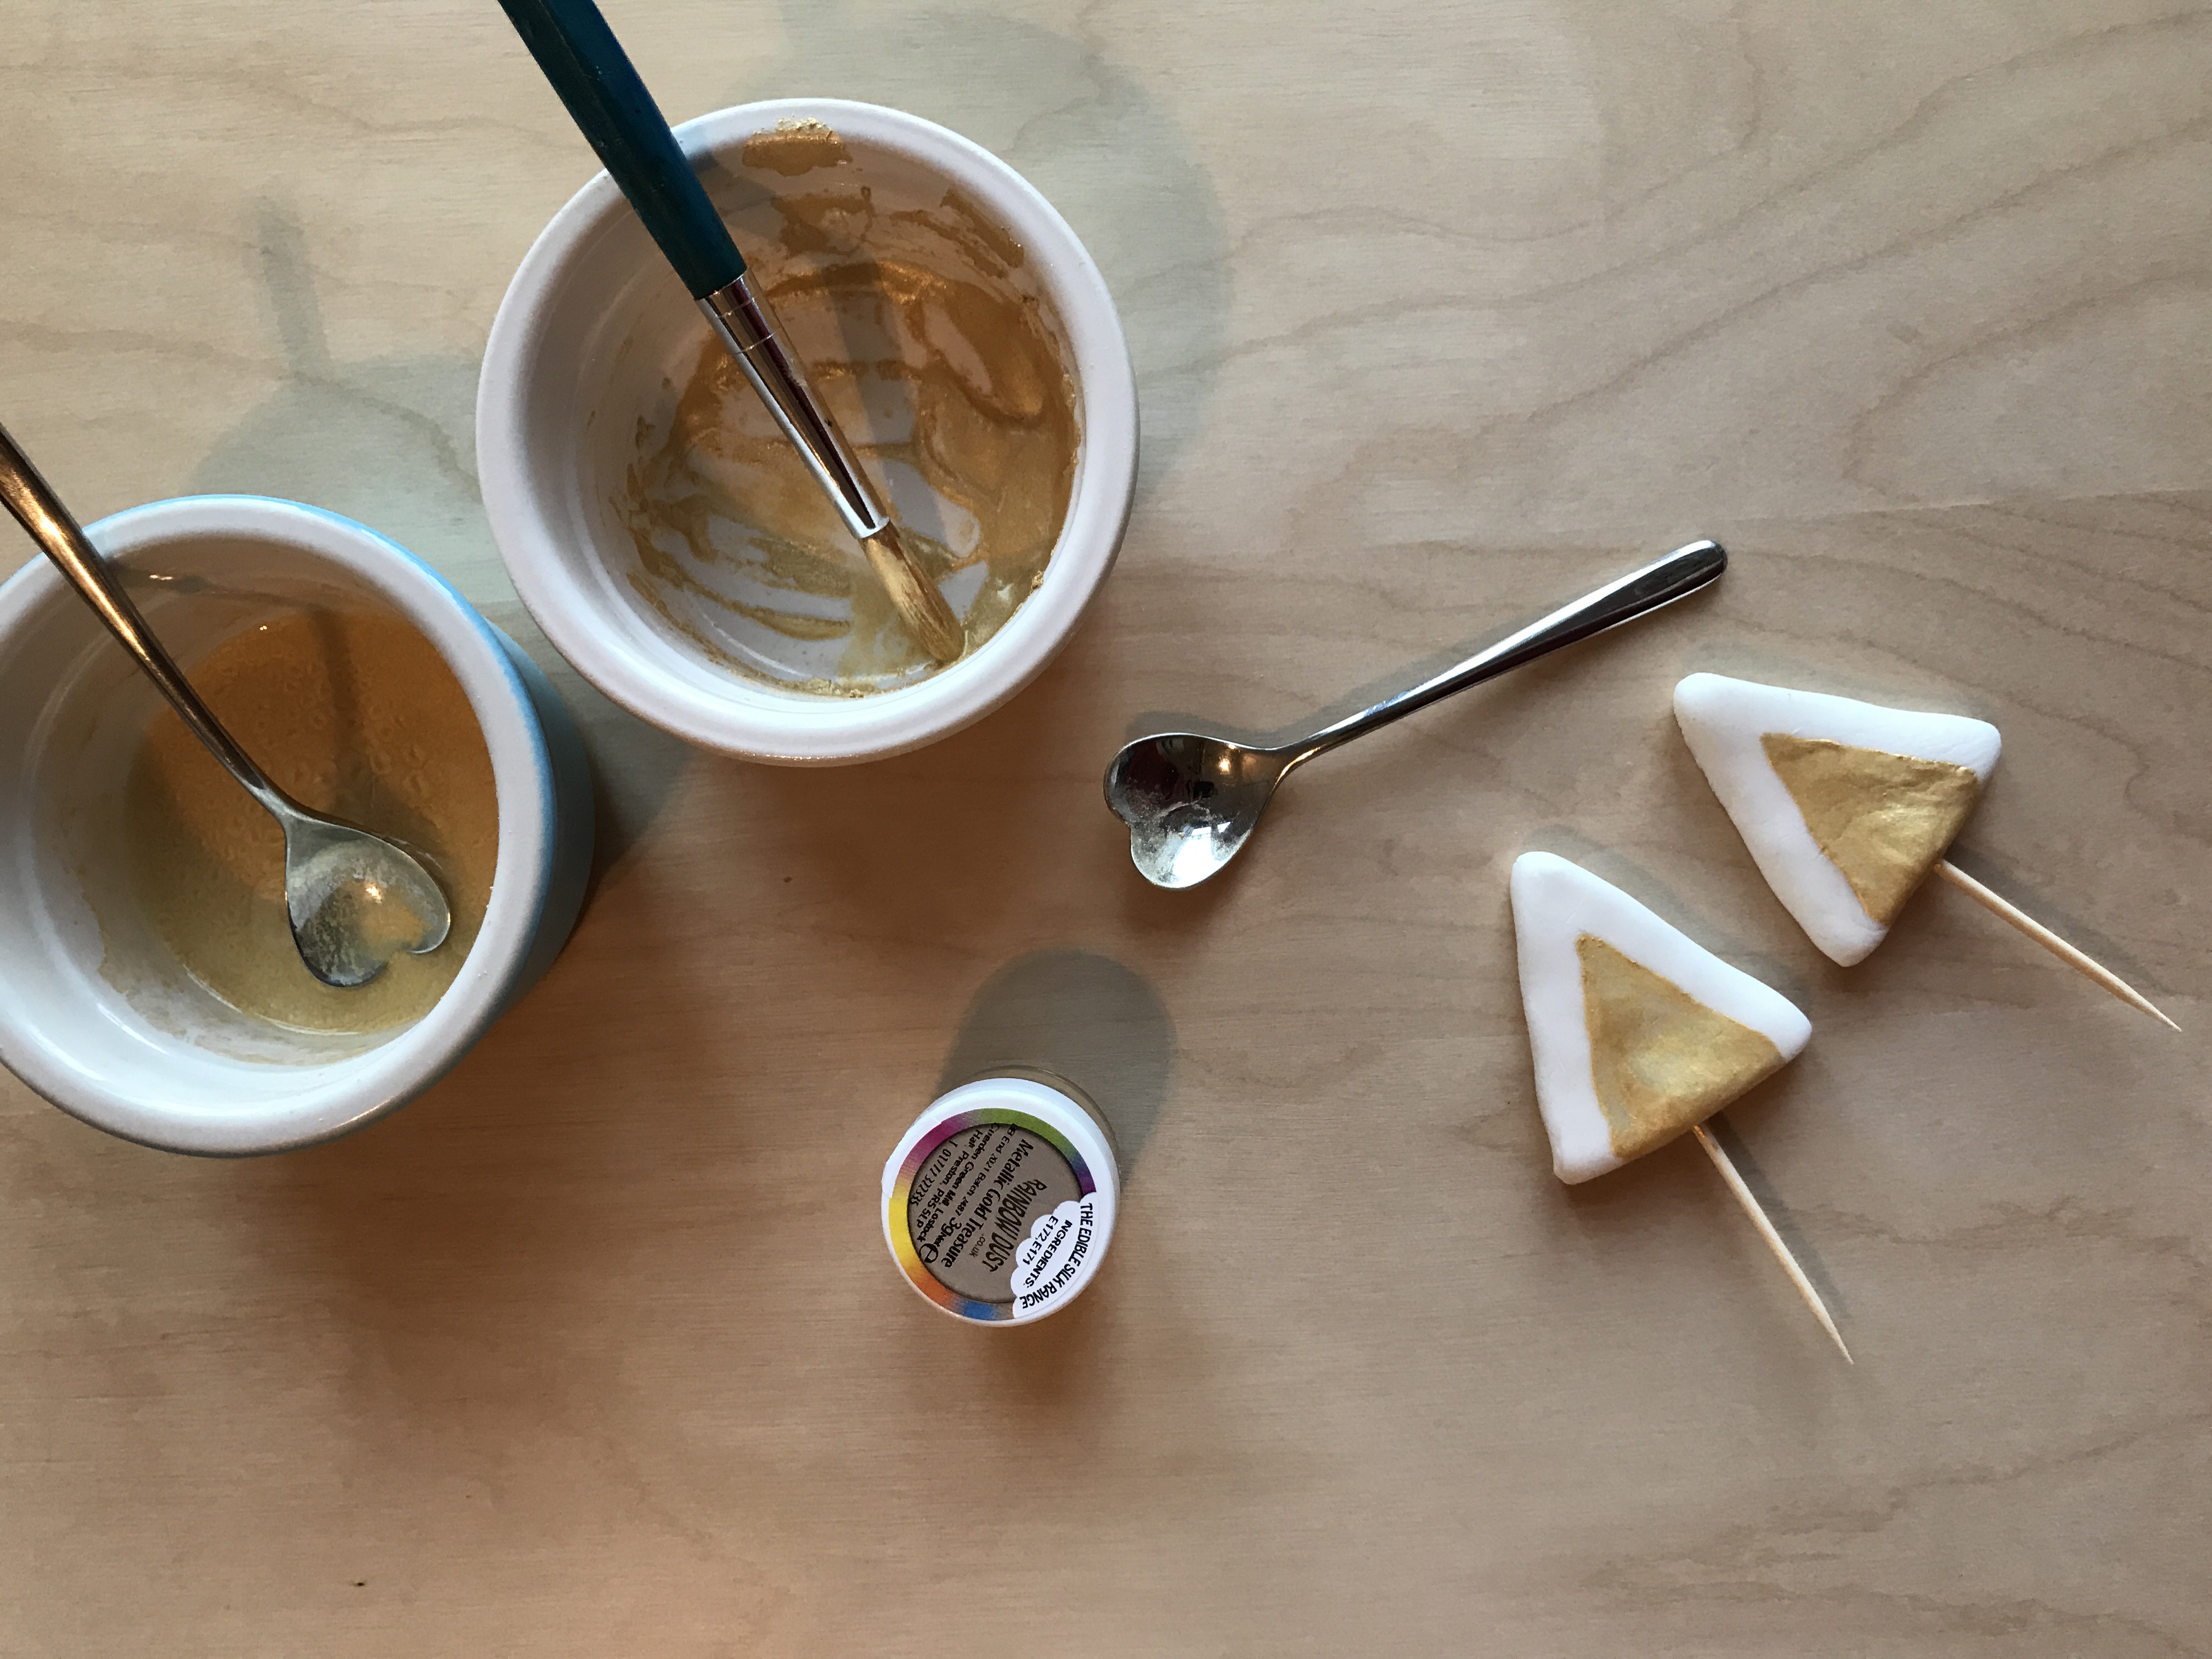
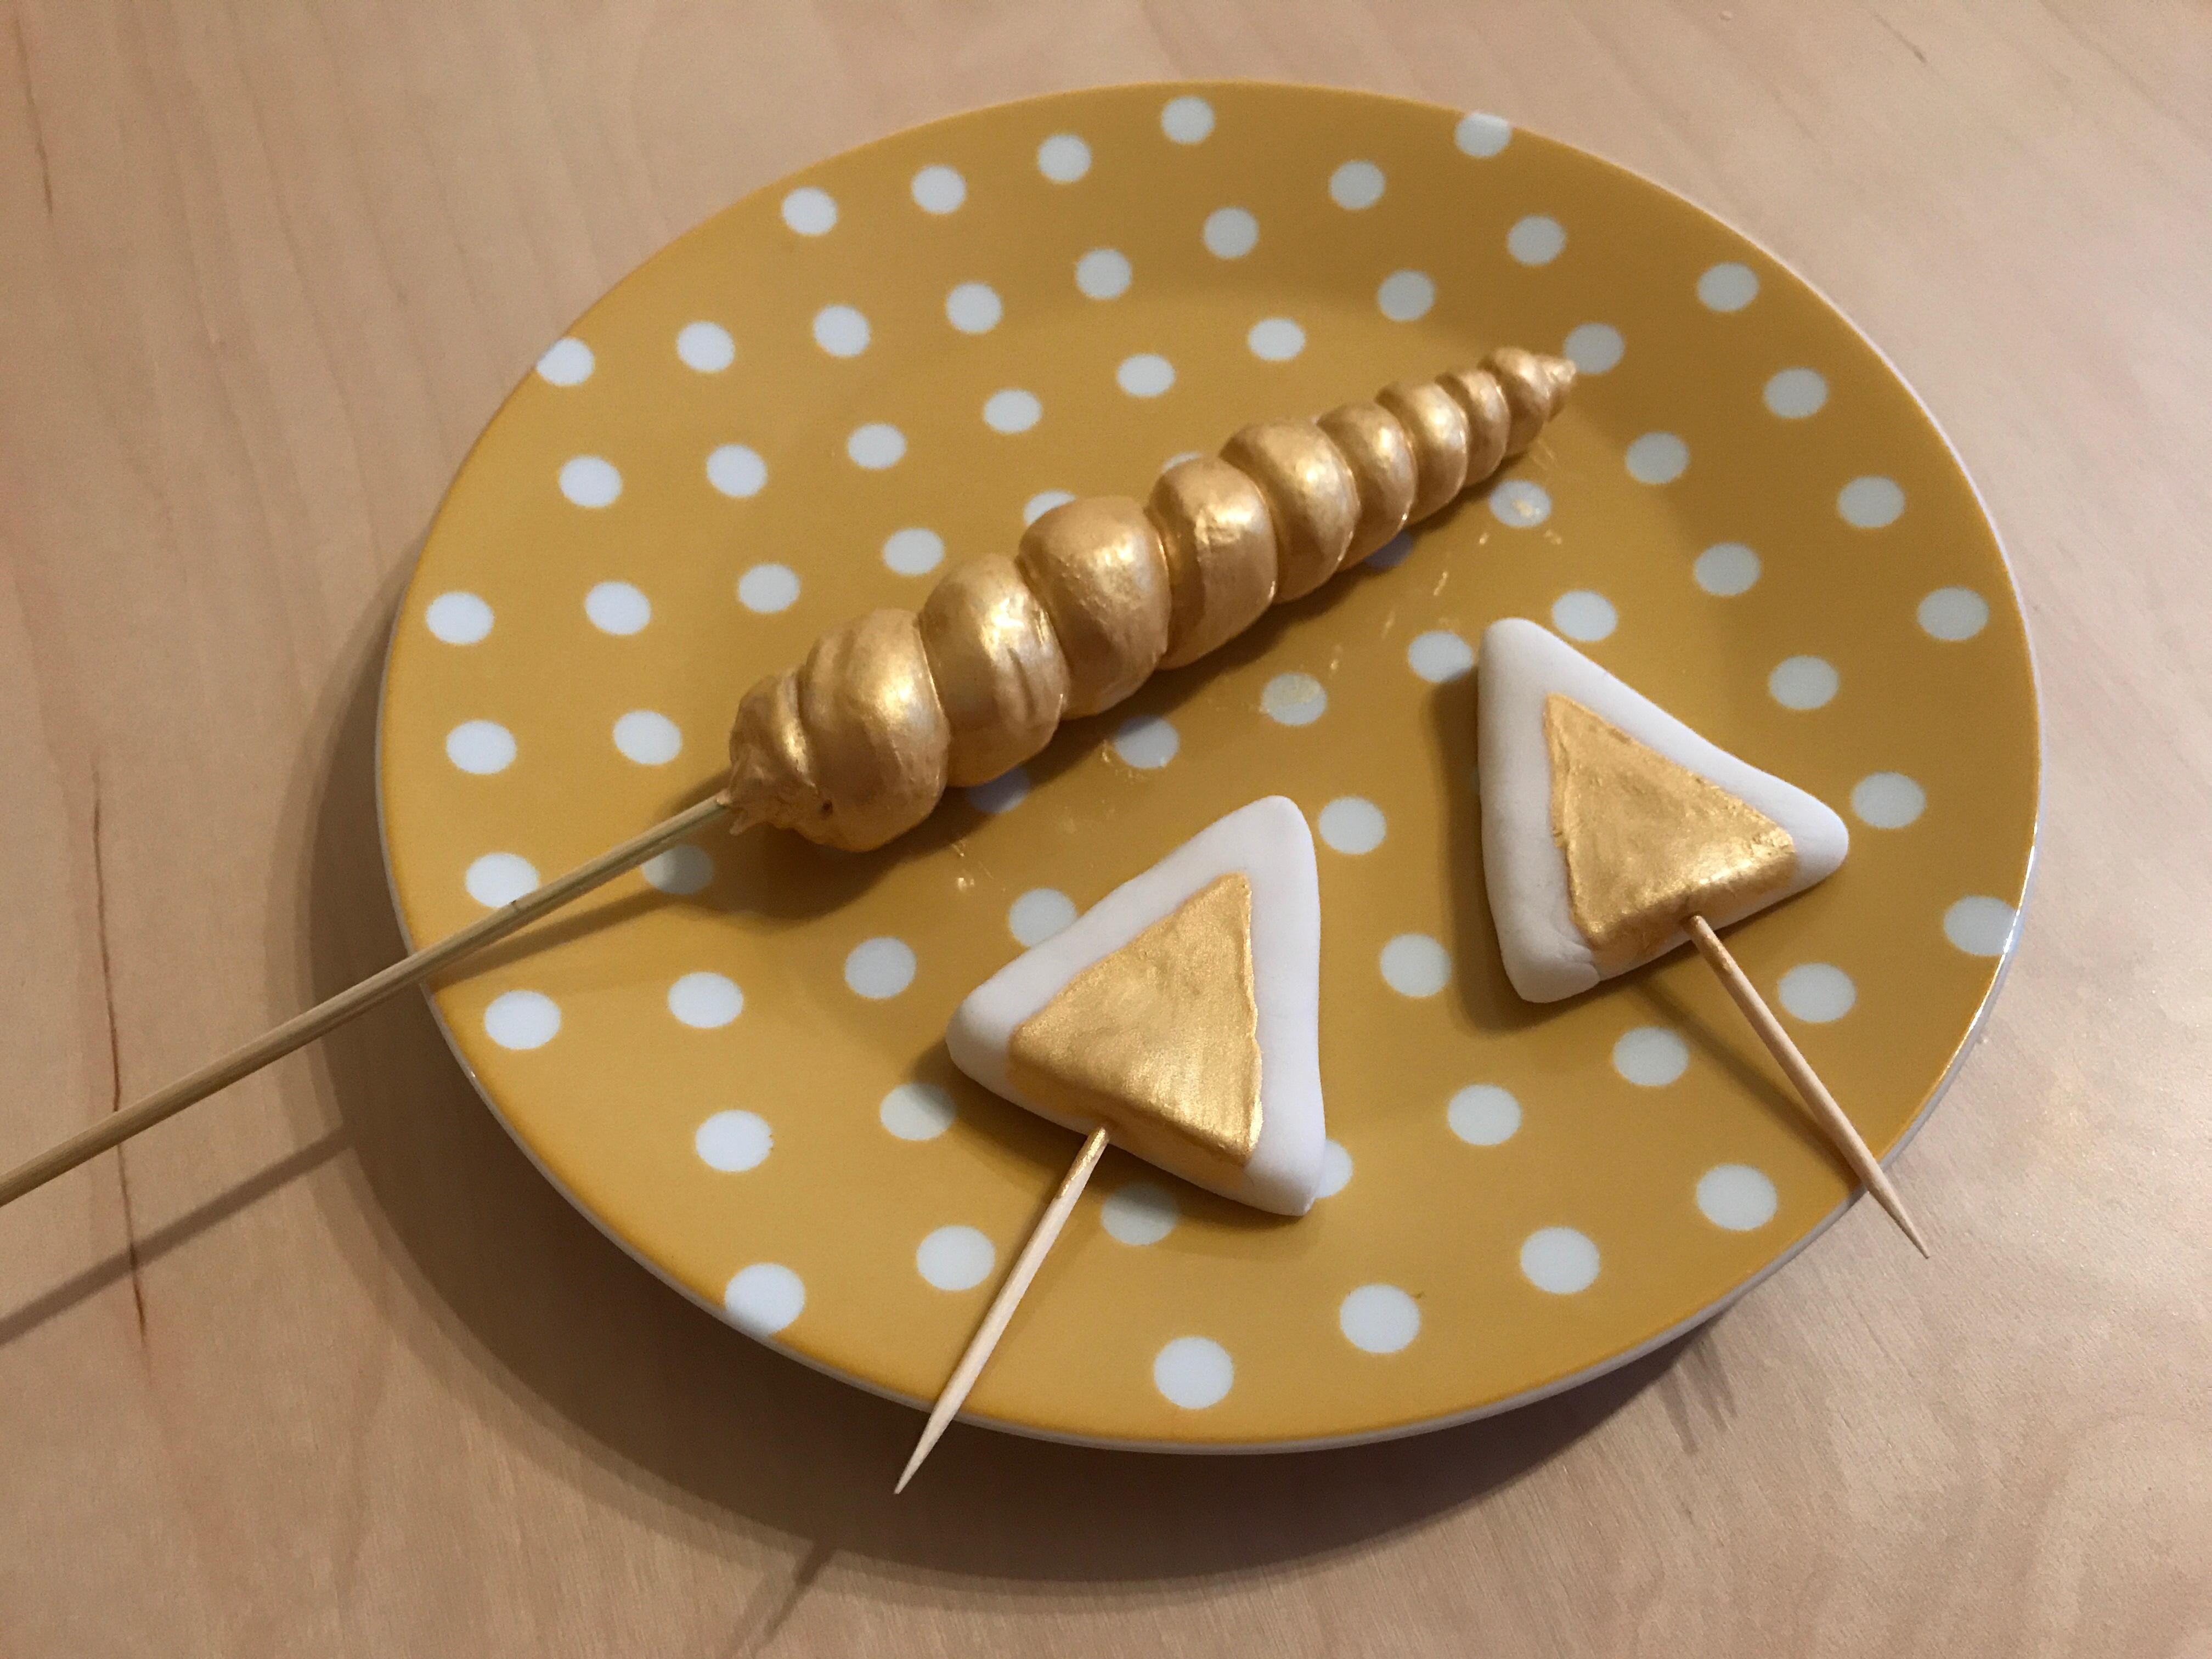
Step 7: Paint the horn and the insides of the ears gold, using edible gold powder mixed with some clear alcohol. The tutorial says two teaspoons, but start with one first so you don’t end up with your pain too runny. You can always mix up some more. On a side note, we didn’t have any clear alcohol in the house, so I used this as an excuse to buy a bottle of gin. Since I only needed a couple of teaspoons, I now have almost a whole bottle of gin to drink. Bonus!
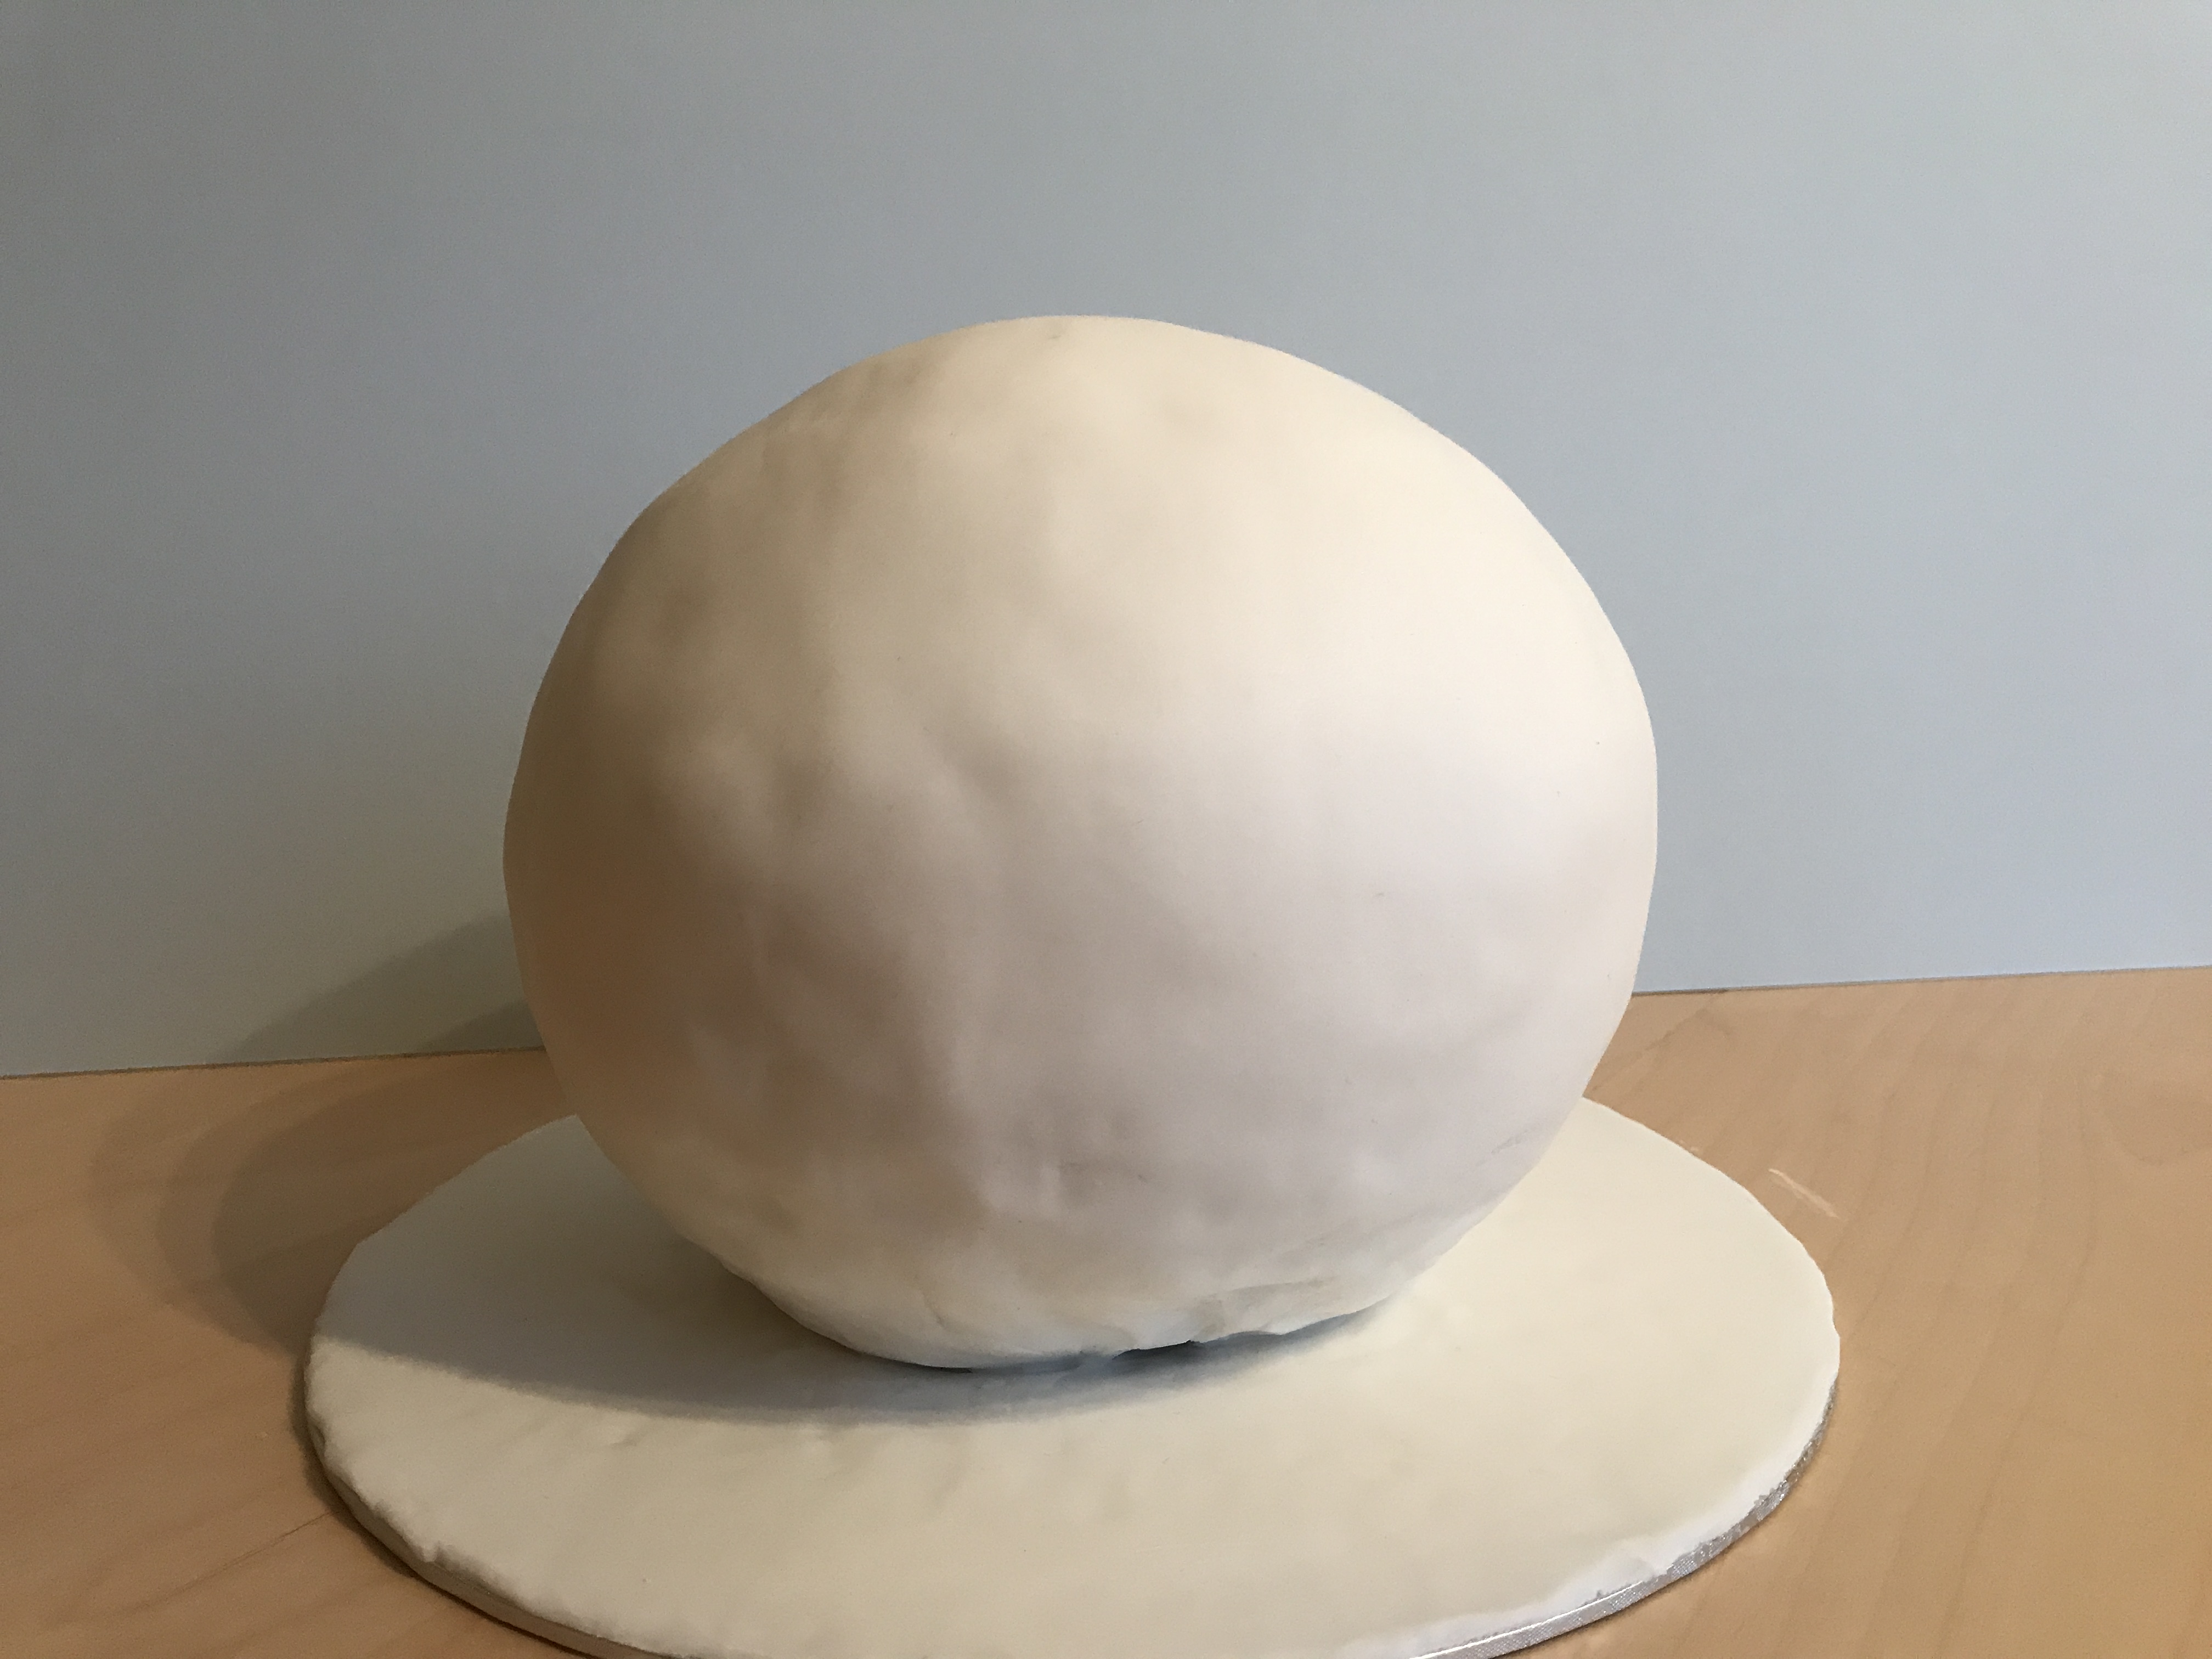
Step 8: Cover the cake with ready-to-roll white icing. I did this while the gold paint on the horn and ears was drying, and followed the tutorial. First you roll it out, then you discover it’s stuck to your table and carefully use a spatula to loosen it (I may have added an extra step here, lol), then you drape it over the cake, smooth it down, and finally trim it around the bottom.
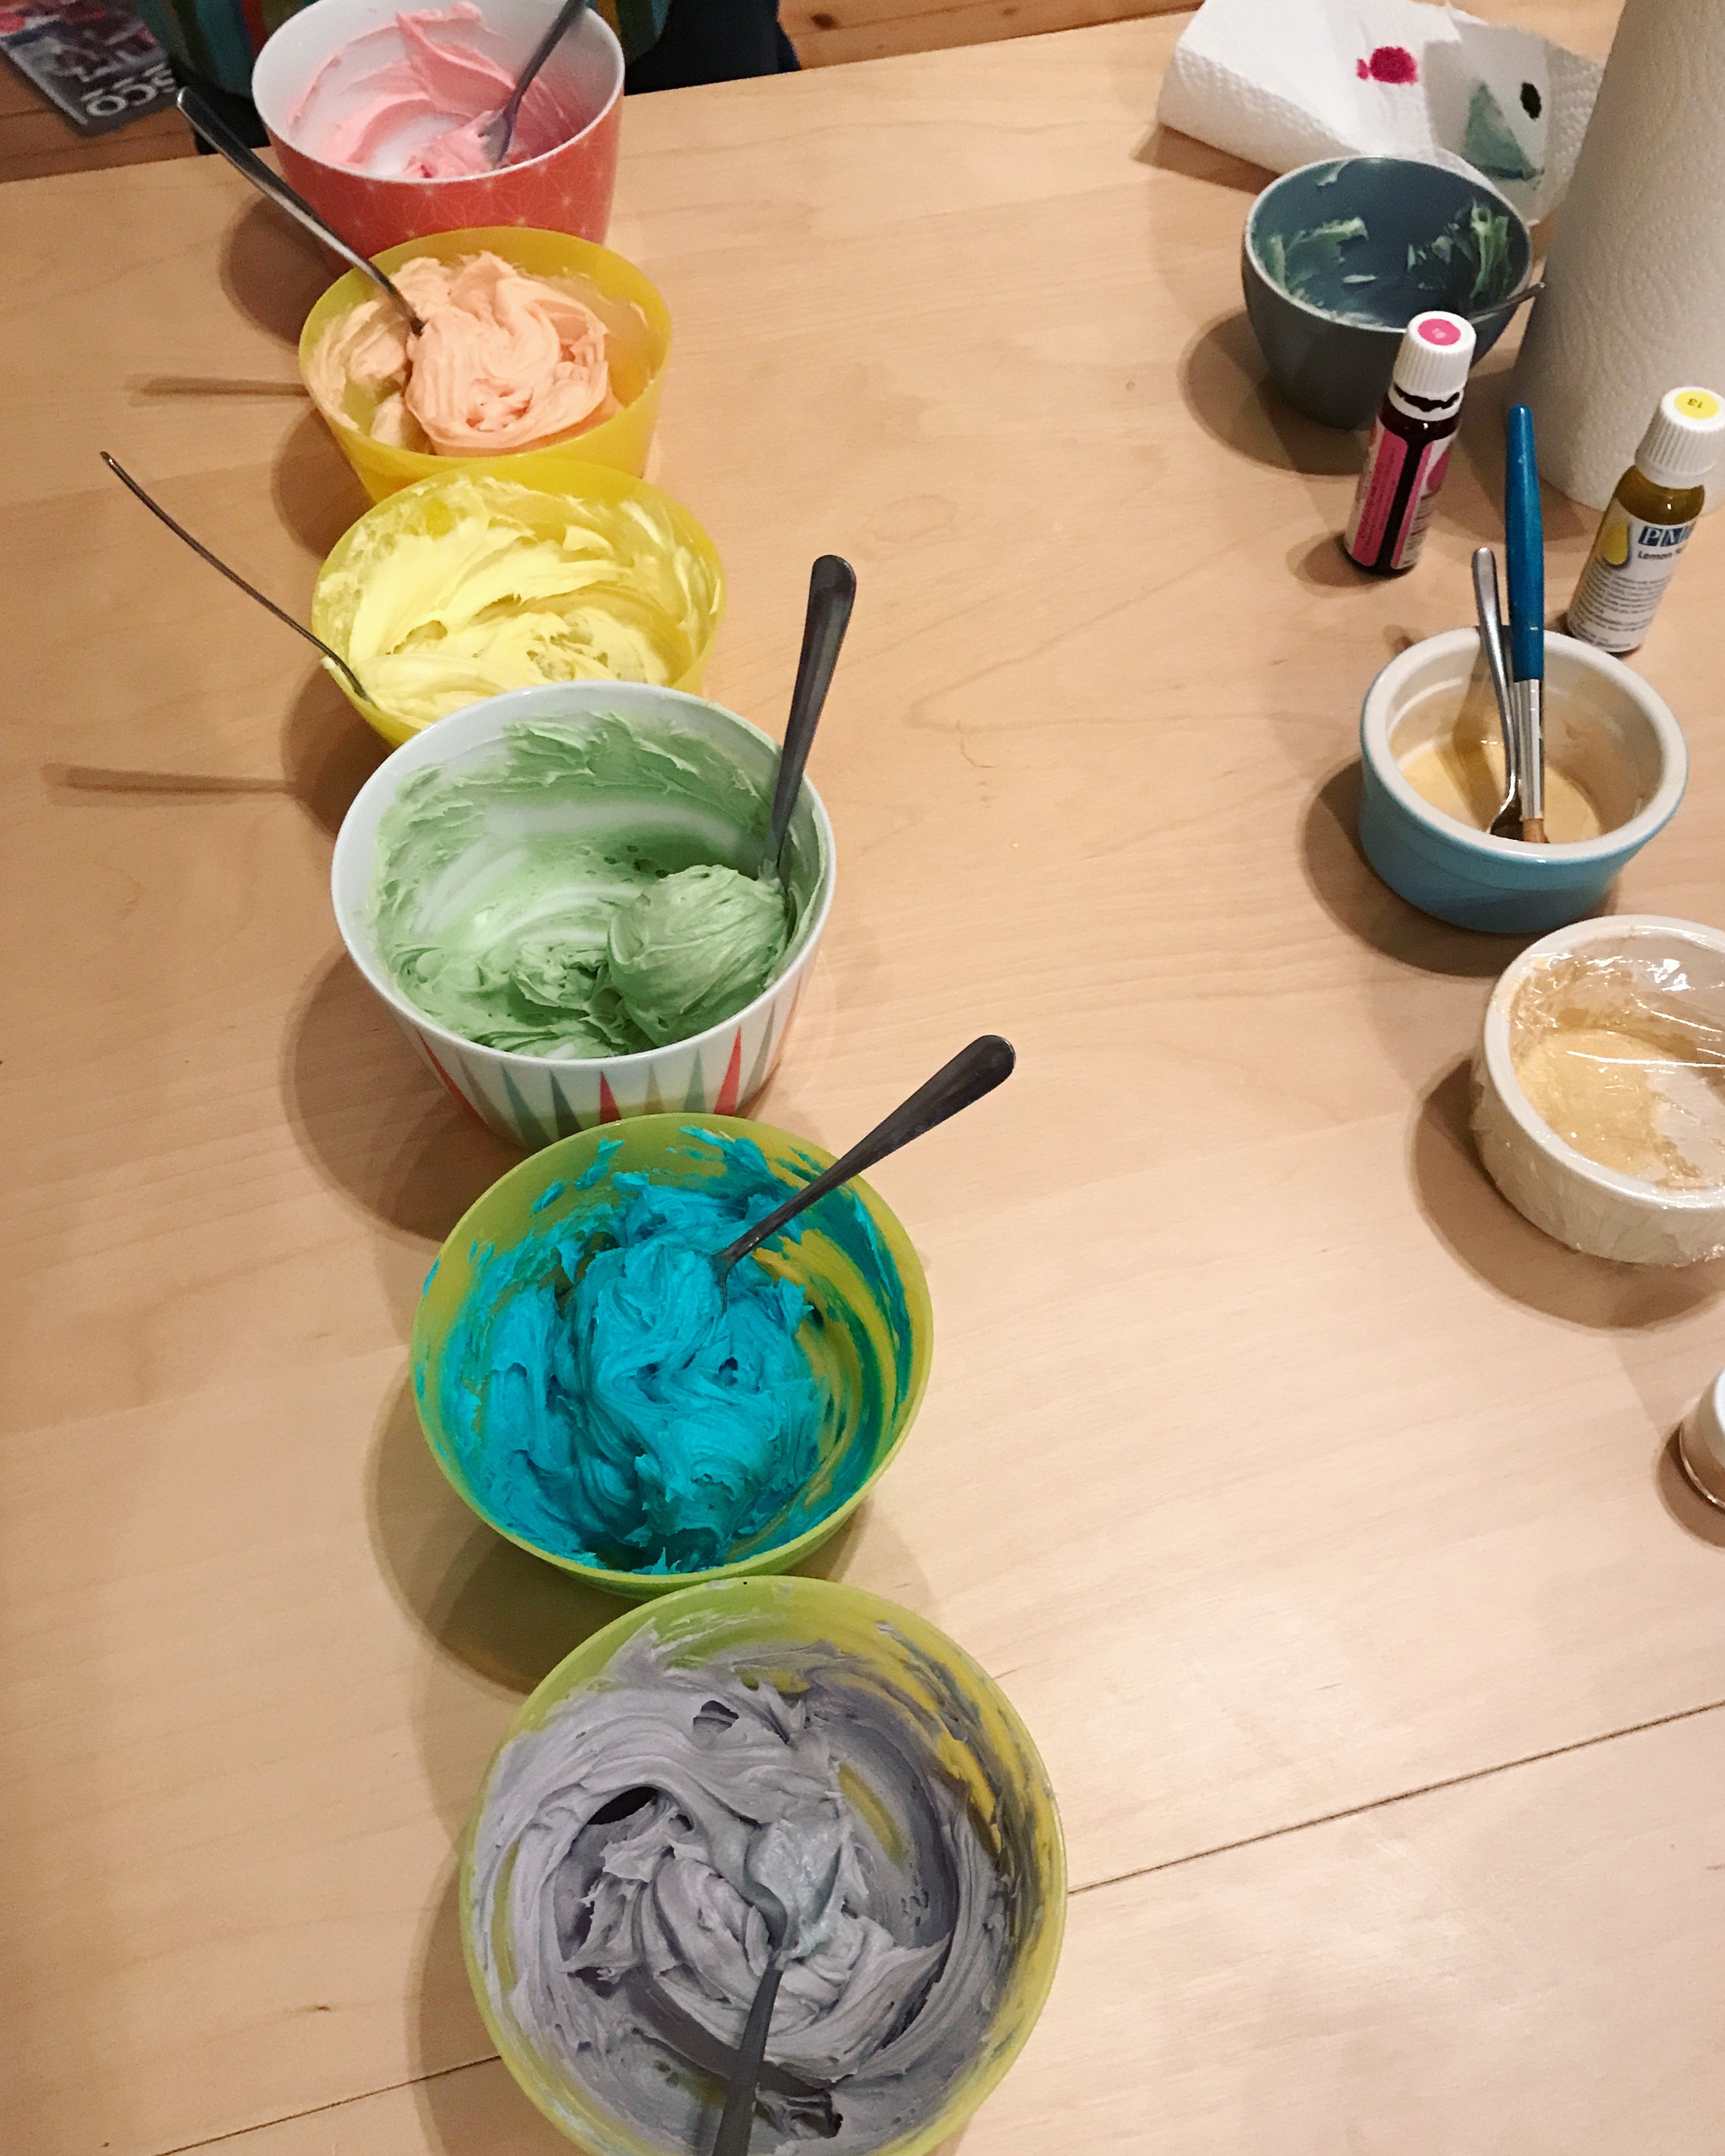
Step 9: Make the coloured buttercream. The original tutorial says to use the reserved buttercream from covering the cake, but there wasn’t much left and since I was doing this step several hours later it had also started to go hard, so I whipped up a completely new batch. I ended up using every last bit of it, so I’d say you will definitely need about double what the recipe in the tutorial says. We (my husband was helping at this point) mixed up six different colours. The purple looks a bit grey in the photos, as this was late at night and the lighting was terrible, but it did actually look more purple in real life.

Step 10: Pipe the coloured icing in rows on to a piece of cling film, then roll up the cling film so you have one long, striped roll of icing. Cut off the excess cling film at one end, and stick the whole roll in to a piping bag, cut end first, that has a star nozzle at the end.
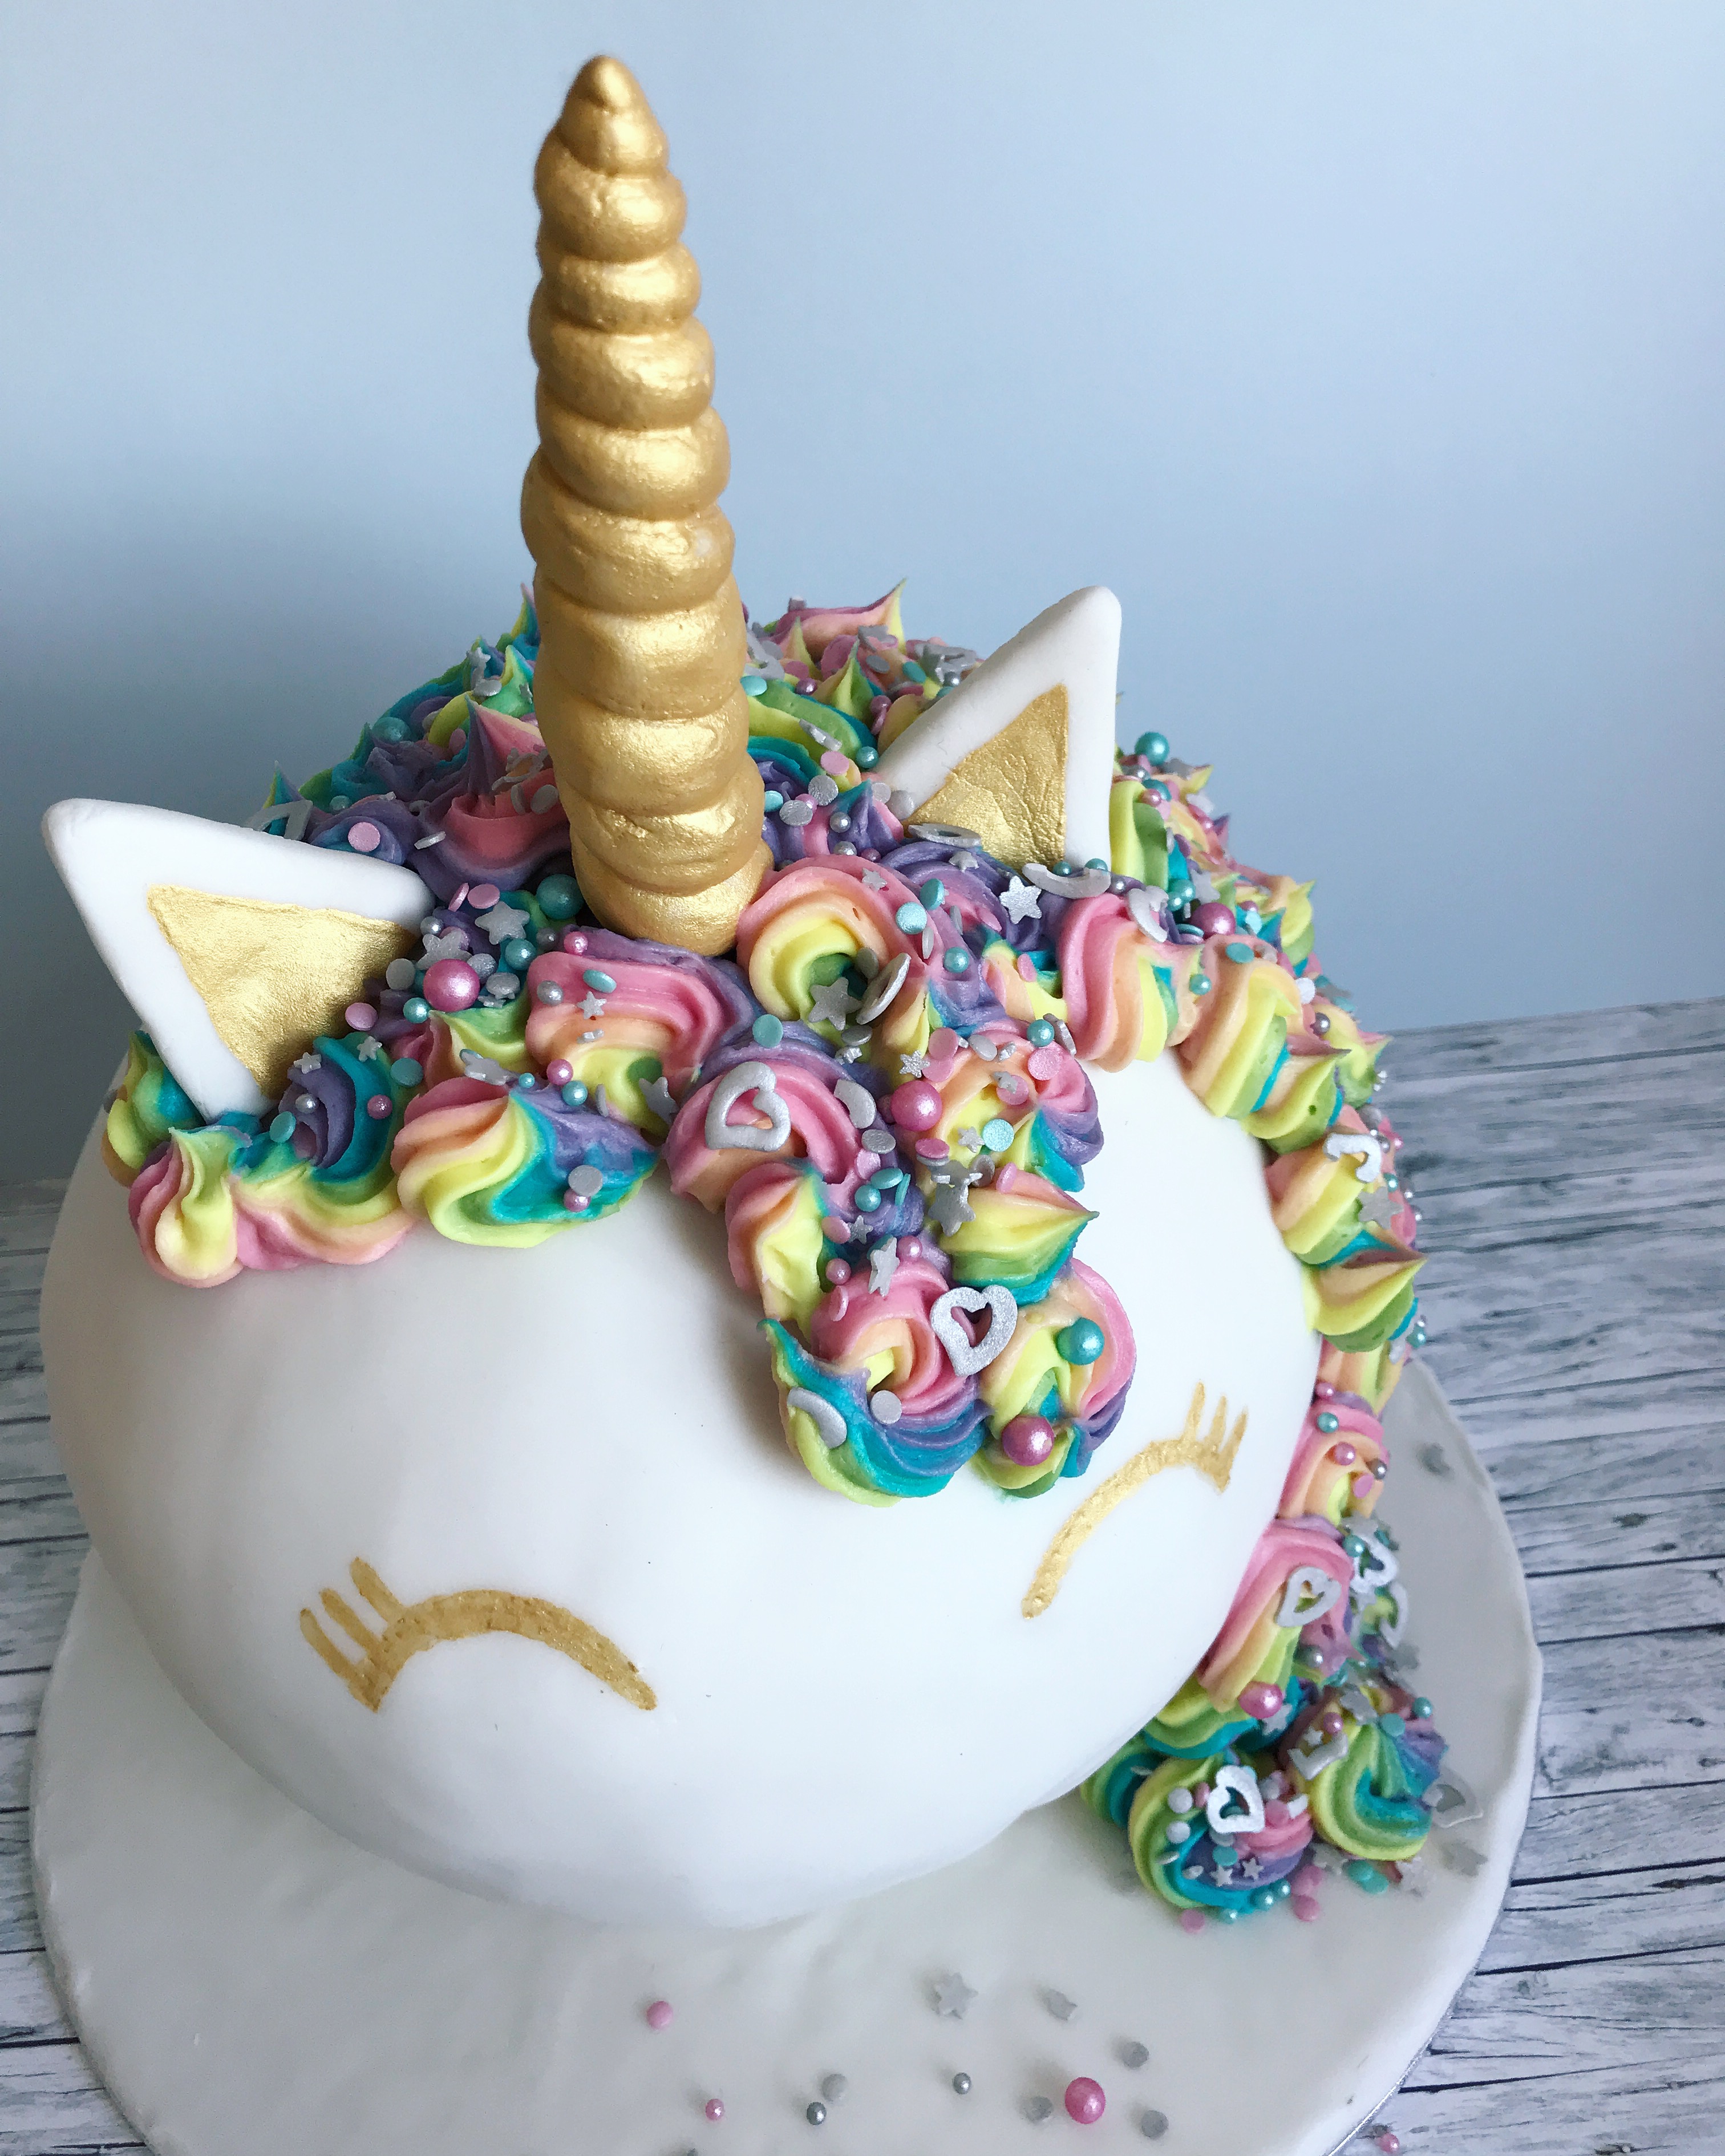
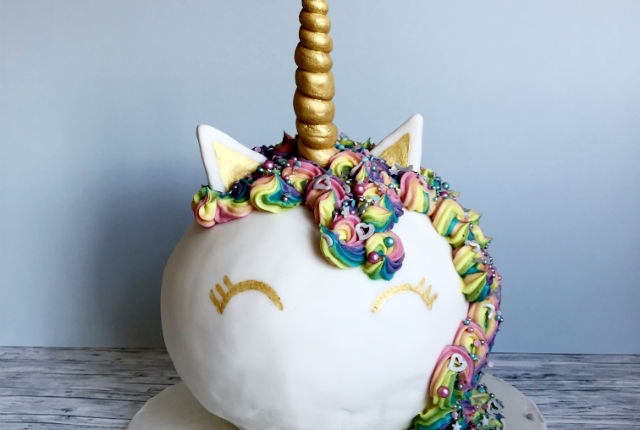
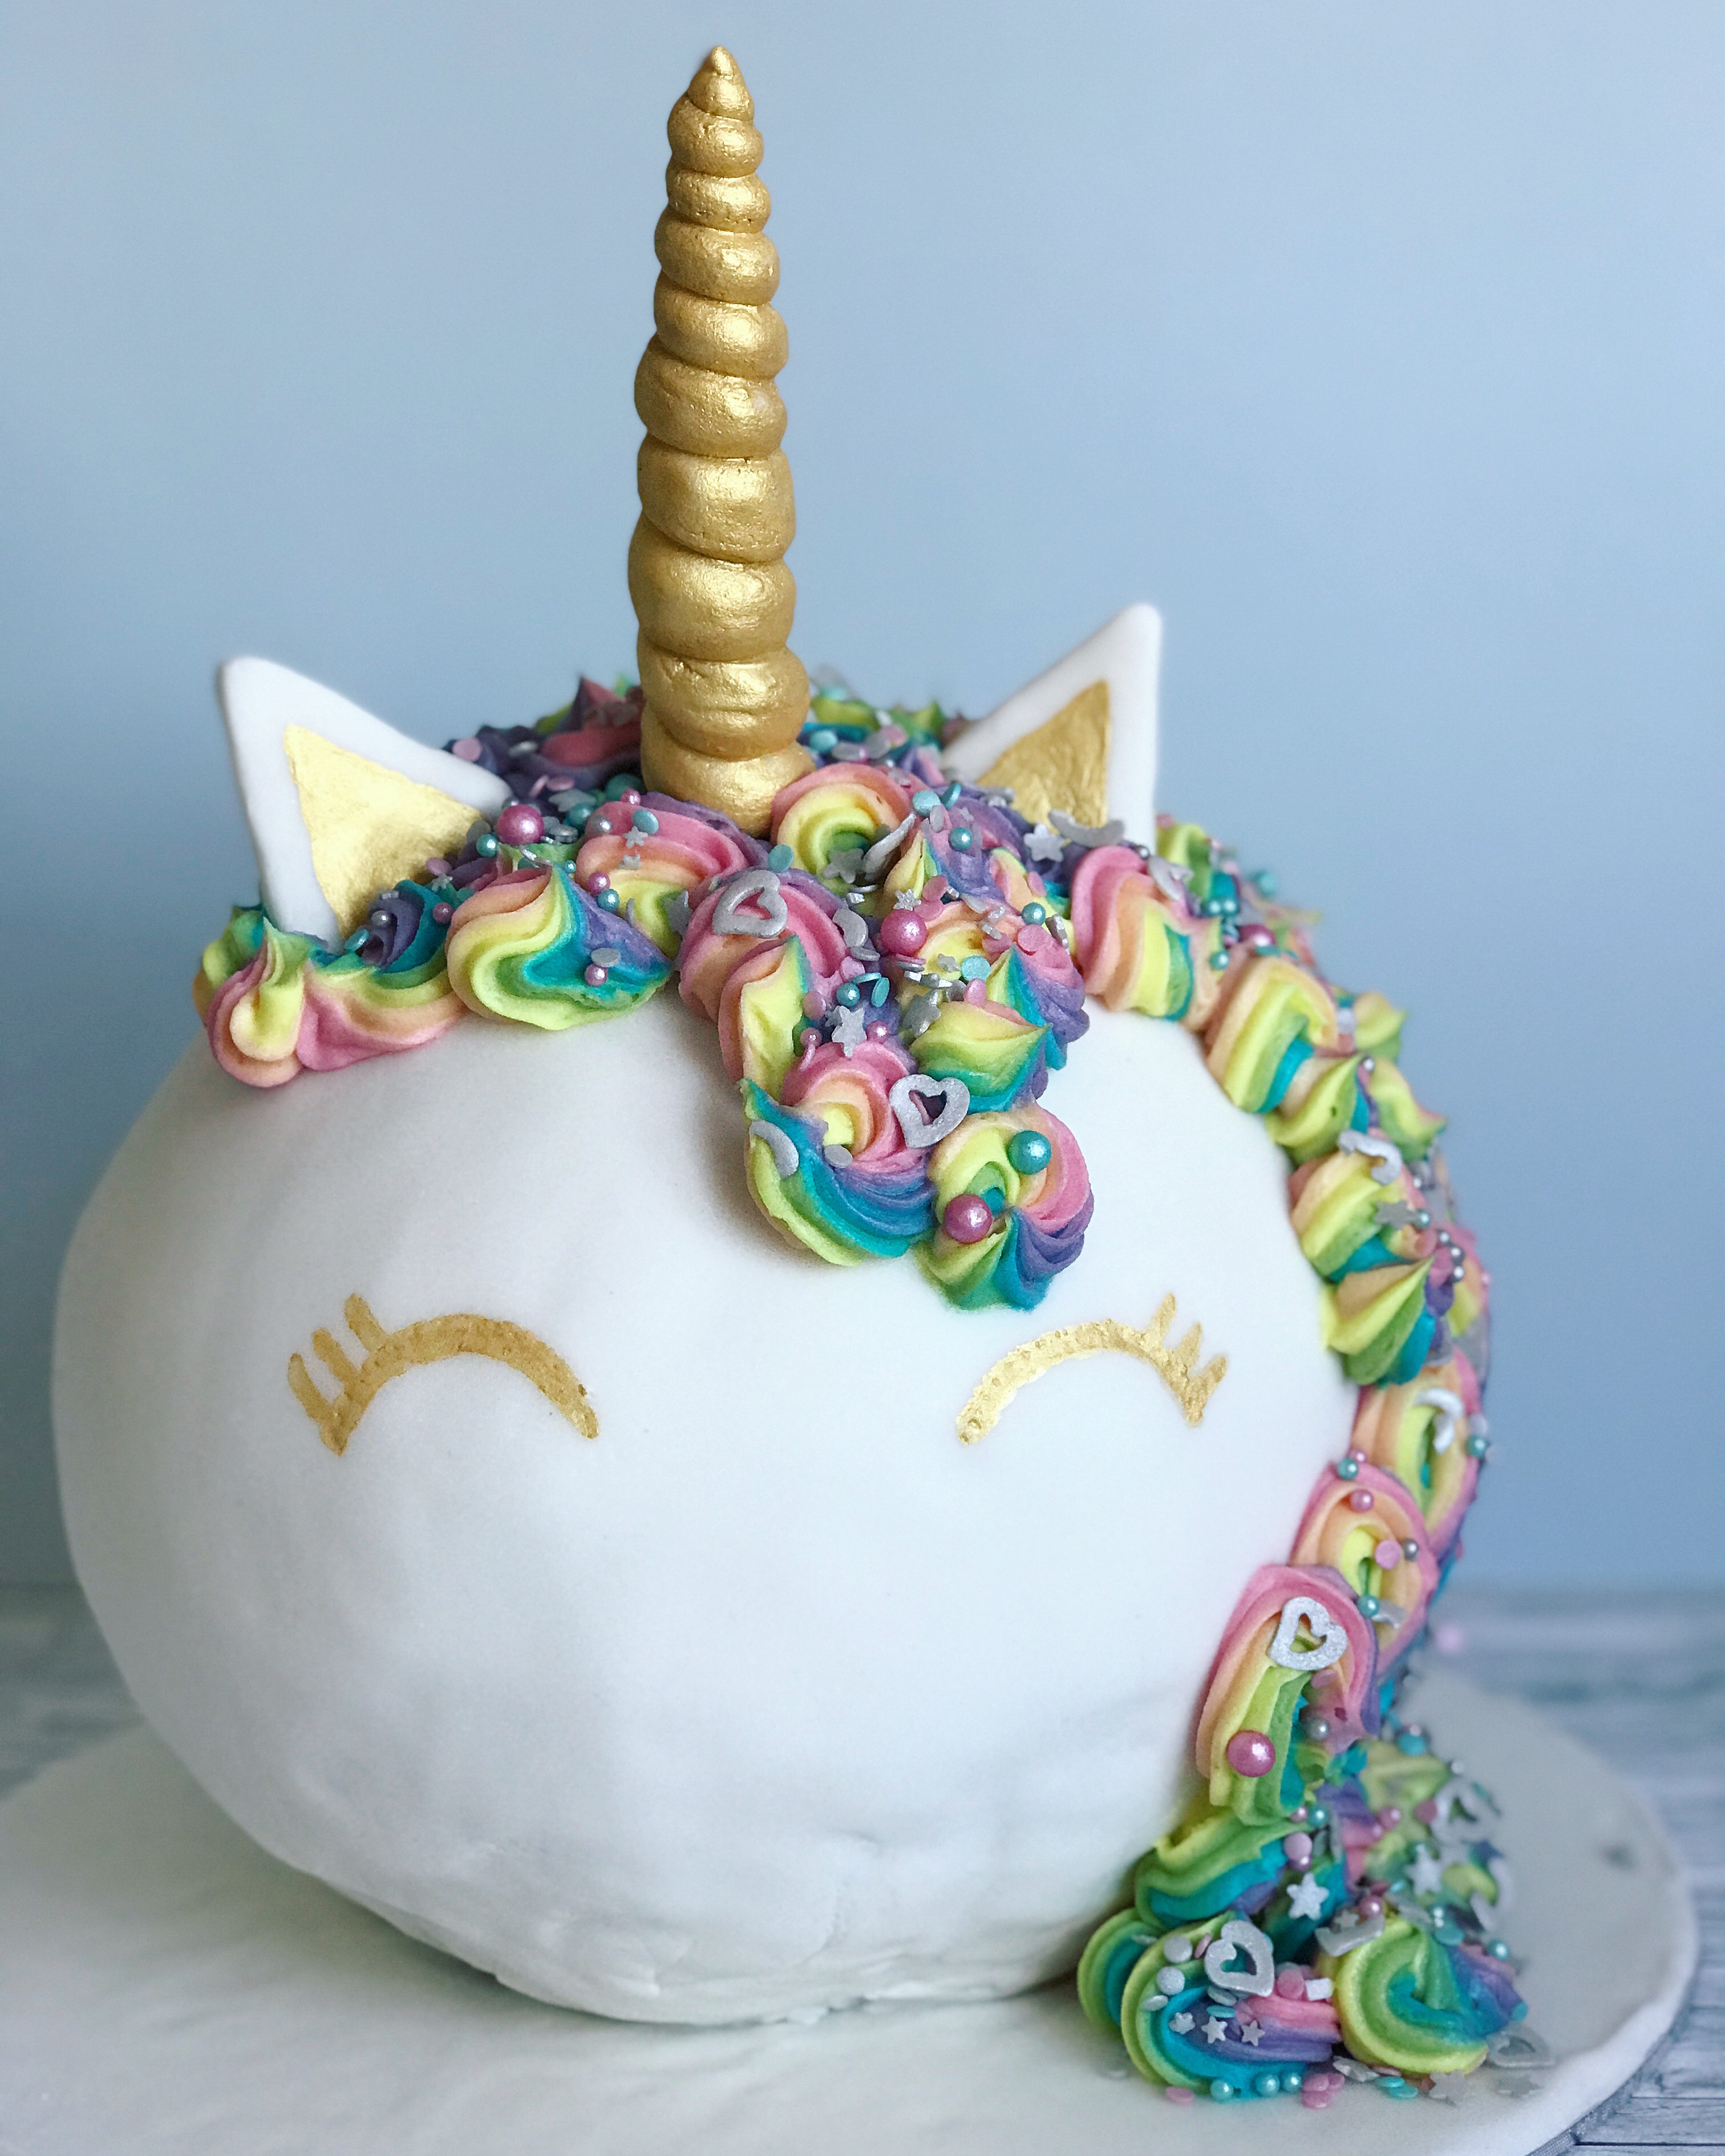
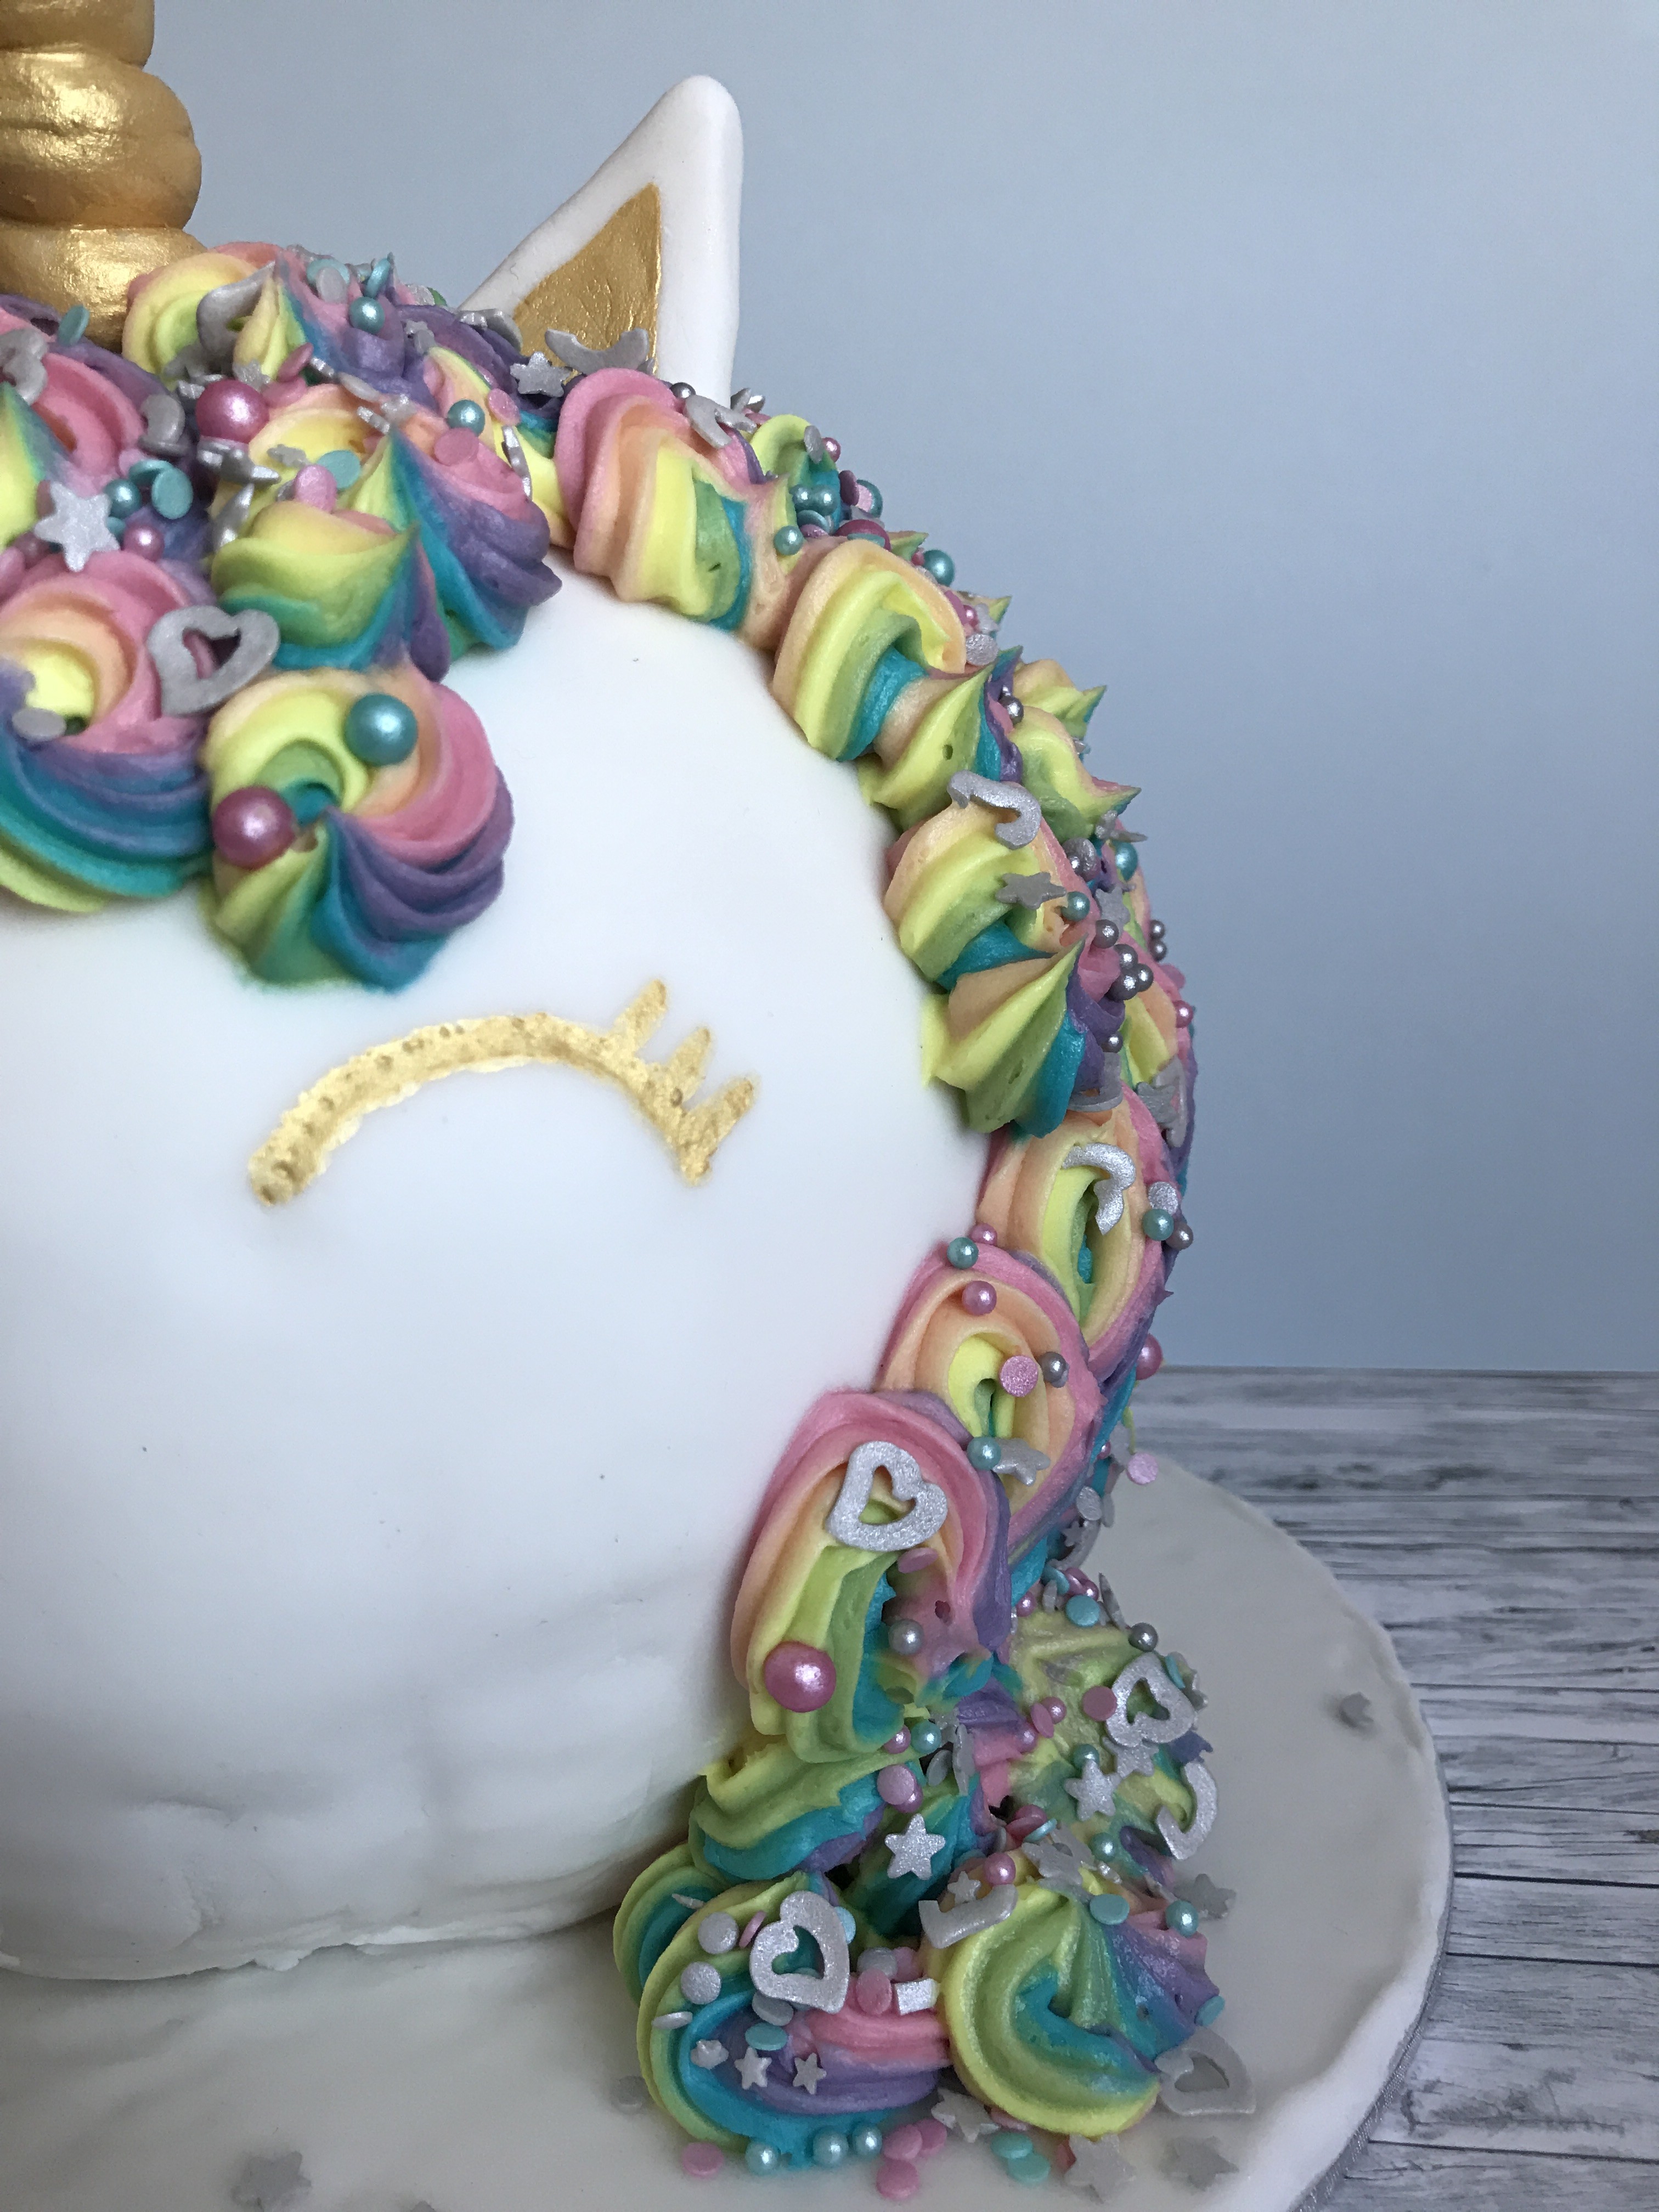
Step 11: Stick the horn and ears in to place, then pipe on the mane. This was the only step I found slightly nerve wracking, but luckily icing many cupcakes in the past had obviously been an advantage. We lightly drew out some lines first, with the tip of a wooden skewer, were the mane was to go, which really helped to guide me. I would also advise adding the horn and ears before doing any of the icing for the mane, as it means you can reposition them if necessary (as we did) without messing up the icing. And in the original tutorial, it says to decorate the cake with sprinkles after icing the mane, but having my past cupcake experience had taught me, that it is best to do this as you go along, because icing once piped starts to set really quickly an then your sprinkles may not stick properly. If you have a helping hand to follow you round and add the sprinkles as you ice, that makes life a lot easier (thank you, husband).
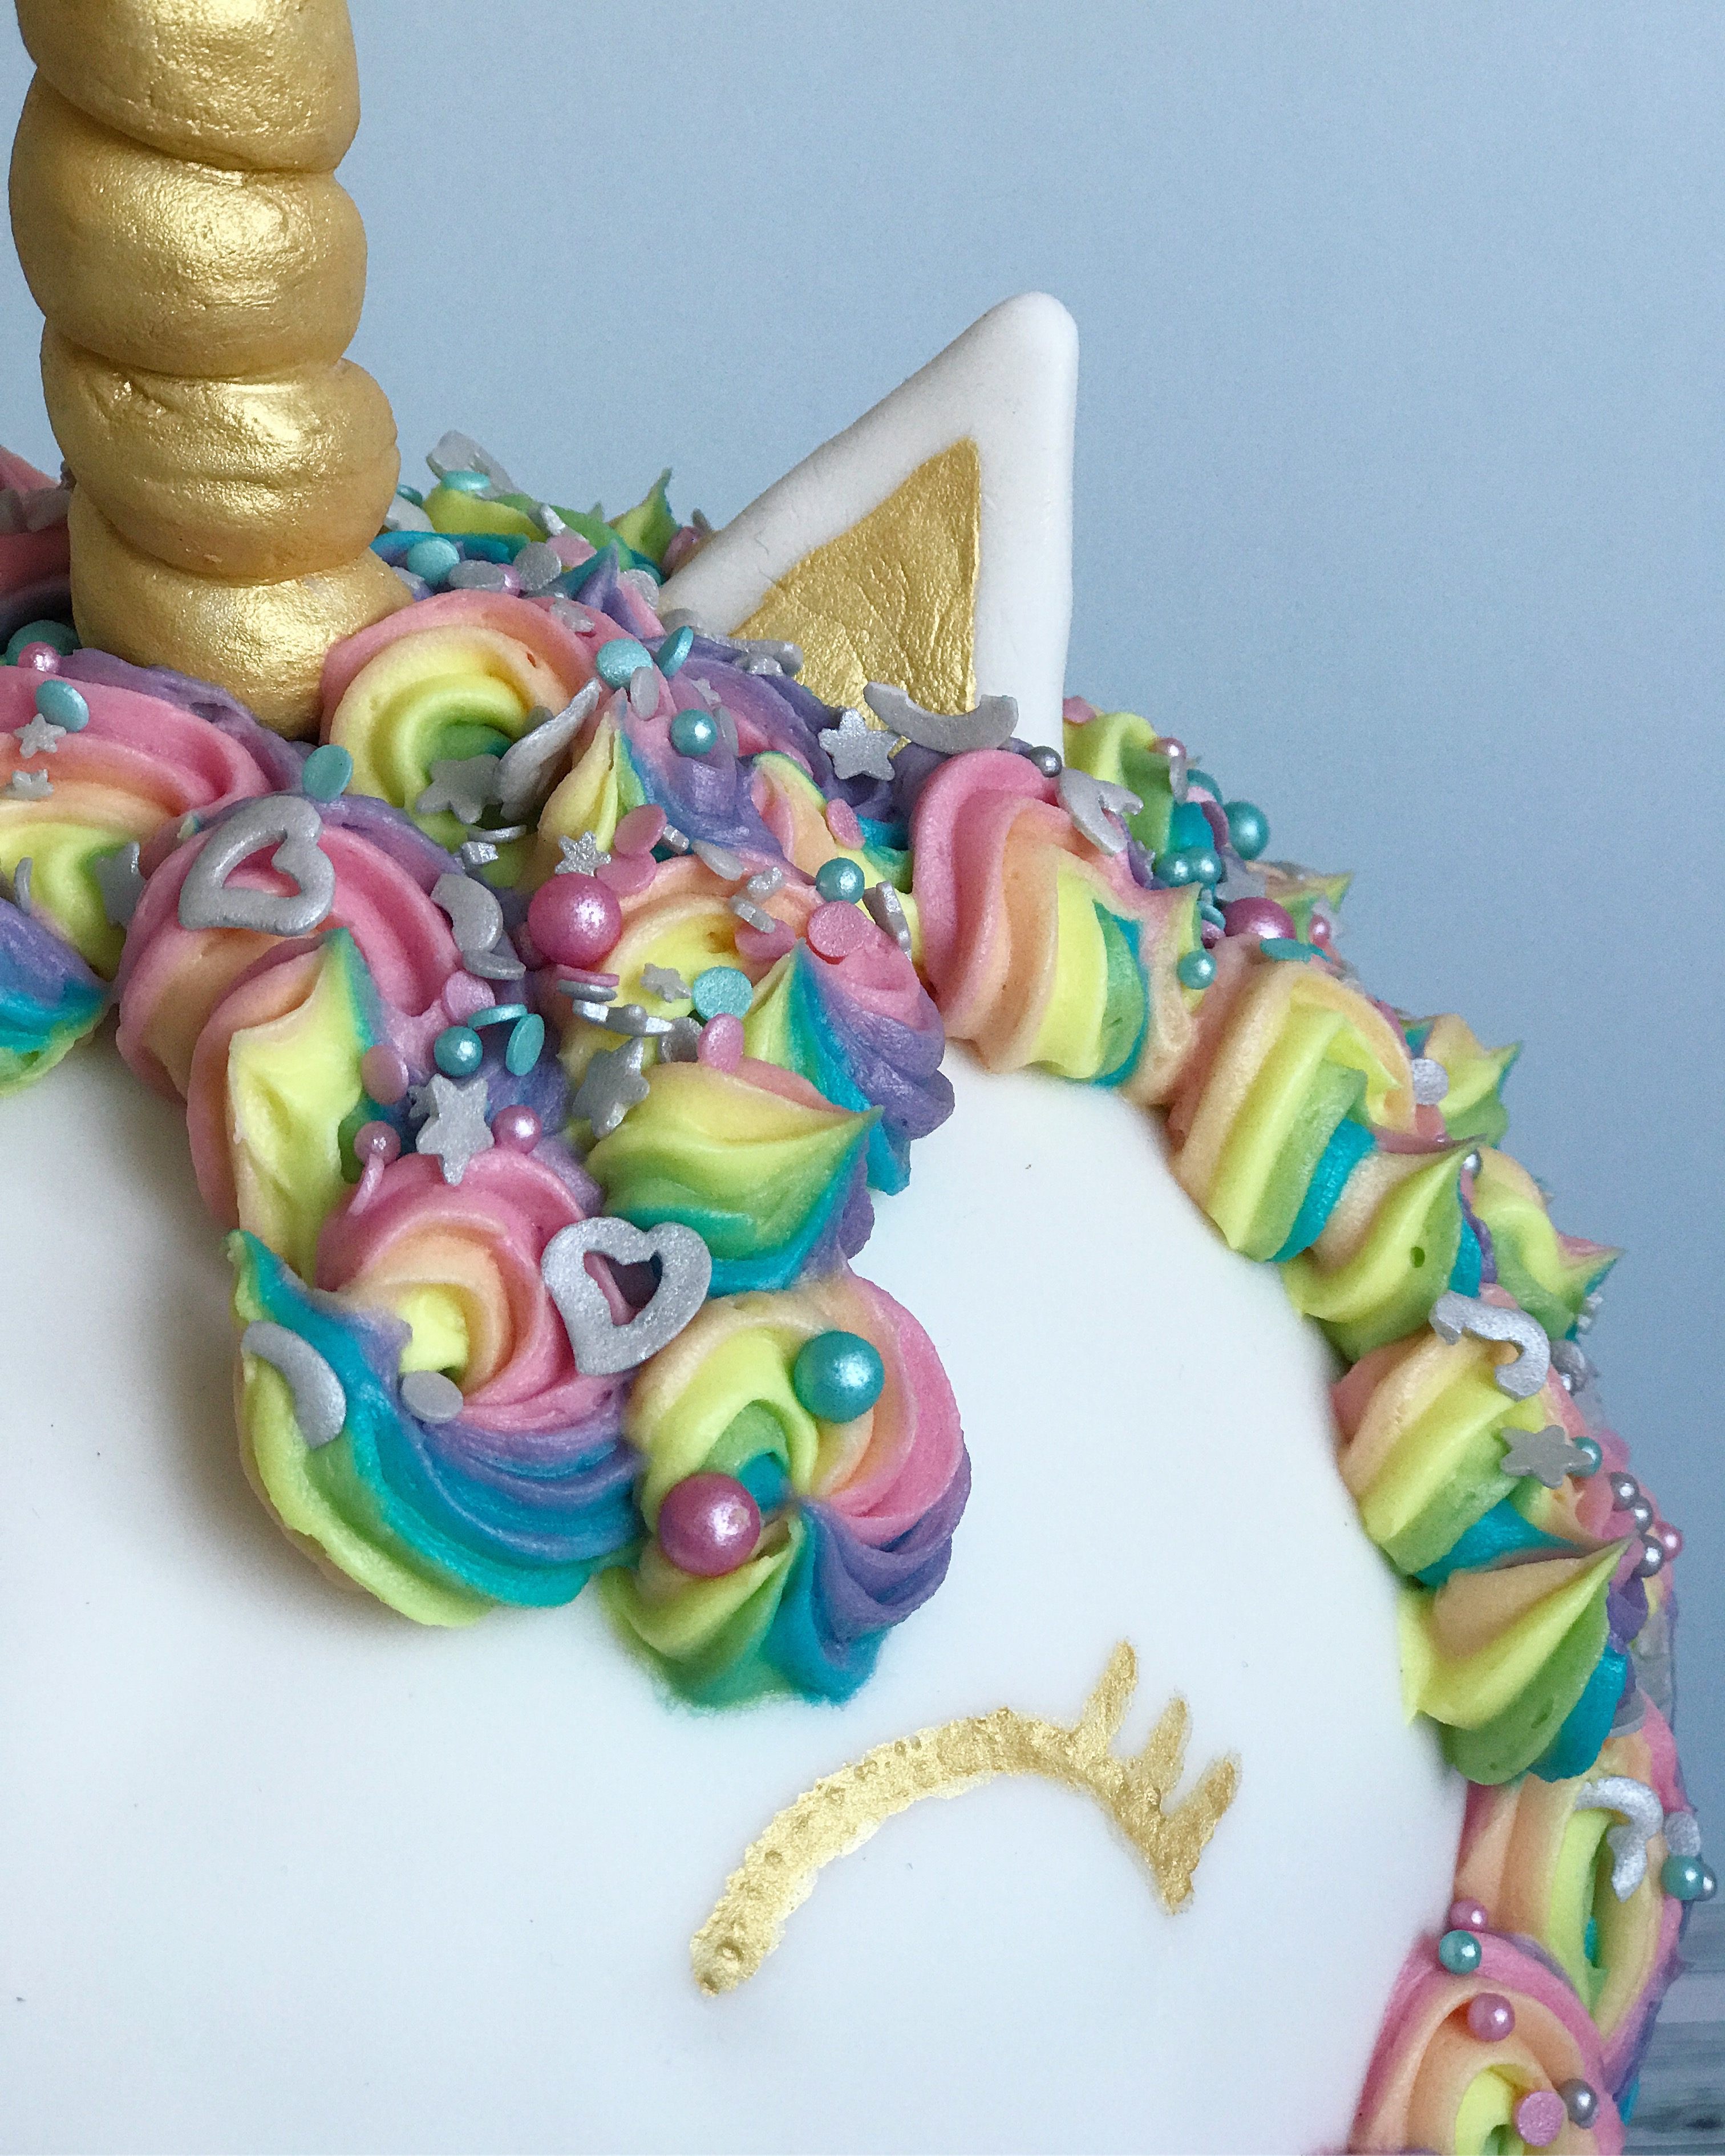
Step 12: Add some eyes! The final step is to paint on the eyes. The tutorial says to use reserved gold paint for this, but mine had started to dry up and gone all lumpy, so I mixed up some fresh paint instead. Again, we marked out where the eyes were to go first, with the tip of a skewer – you can just see some of the little dots under the gold paint, in the photo above.
And that, was it! After two days, and a dozen steps later, one magnificent unicorn cake to knock the socks off my (not quite so little any more) boy off the next morning. We stuck it in the fridge over night to keep it fresh, and I was absolutely terrified we would drop it! But it made it to the birthday table the next morning in one piece.
You can find the full, original tutorial over on the Lakeland Blog. People have been asking if it tasted as good as it looked – and yeah, it did. Vanilla and chocolate with buttercream icing, can’t really go wrong with that. Do keep in mind that this was basically four cakes worth of batter, which will leave you with a HUGE amount of cake. Luckily we had an event for families at church the next day, so we took three quarters of the cake with us to donate to the buffet, still leaving us with more than plenty for the four of us.

All about a Mummy
I made similar versions for my 2 daughter’s joint birthday party this year. Love the spherical design! If you dust your worktop with icing sugar and keep turning the icing as you roll it then it shouldn’t stick (she says hopefully!)
Emma Lofthouse-Burch
It looks fantastic, well done! I like the look of that hemisphere tin too x
Ana De- Jesus
I agree that has to be one of the most visually stunning cakes that I have seen to date and I love the unicorn horn and rainbow mane especially! it is beautiful x
Talya
Oh my word what an awesome looking cake! I love anything unicorn this is simply fabulous.
Helen
What a fantastic tutorial for a simply stunning cake! It’s so magical and perfect for anyone who loves unicorns :)
Sassy
Oh my, this is such a cool cake!
Your hard work certainly paid off! Just wish I could have tasted it! ;) xxx
Cath - BattleMum
Oh my word that is a masterpiece. It looks too good to cut into. I wouldn’t have the patience for doing all of that over 2 days so well done!
Alexia
It’s fabulous! Well done
Rhian Westbury
Wow that is an incredible cake and you have done such a great job with it. I’d love this for my birthday x
Cathryn - Little Paper Swans
Oh wow this looks incredible! I’ve baked my daughters birthday cakes and thankfully they were a lot simpler than this. You did an amazing job.
Helen Little
What a gorgeous cake! Well worth the effort it’s superb.
Flavour Seeker
Good work, I’ve just finished the Lakeland tutorial and found similar issues to you. Icing sticking to the table and not enough buttercream. The cake also didn’t fit in my fridge so I was unable to cool. I cut each layer in half as per the recipe and it meant that it was too sloppy with all the layers of jam and left an uneven finish. I’d leave that step out next time. Thanks for sharing.
Amanda Daniel
I am planning to make this unicorn cake for my daughter’s birthday next week. Can I ask if people followed the guide on the tin packaging which says to use a 4 egg recipe (so 8 in total) or the actual unicorn recipe which says to use 11 eggs?! Not sure which to follow!
Jenni
I actually used my own recipe (linked to in this post), which uses 4 eggs, but I had to double it to fill this size baking tin, which made it 8 eggs per half, or 16 eggs in total.
Pingback: 25 super easy ball cake pan ideas | My Silly Squirts
Pingback: 20 super easy ball cake pan ideas | My Silly Squirts