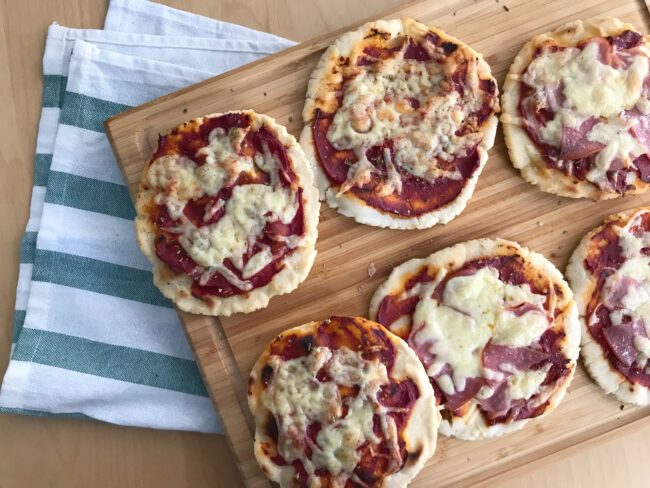
Mini Flatbread Pizzas
Today is our first day of Summer Camp cooking, and we are going to be making mini flatbread pizza. These are really easy to make – no special flour needed, no faffing around with yeast. The recipe makes six small pizzas, which is great for a light lunch or a healthy afternoon snack. Or just double the quantities for a bigger meal. All the cooking and baking I do at home is gluten free, since I have to avoid gluten, so all recipes here on the blog are either gluten free too or can easily be adapted.
Now, first of all – and I always tell me children this – read the whole recipe through from start to finish. Then gather all your ingredients and utensils before you begin. And don’t forget to wash your hands before cooking. At the end of the recipe, I’ve also highlighted which parts I think are particularly suitable for kids to help with, though of course you need to judge that a little yourselves depending in your kids’ ages and abilities. So, happy cooking!
This recipe is suitable for: gluten free, vegetarian, nut free; can be adapted to dairy free & vegan by using an alternative cheese or you could try it without cheese.
Ingredients
(makes 6)
- 250g self-raising flour (gluten free if required, I use Dove’s Farm gluten free flour)
- 2 Tbsp olive oil
- Pinch of salt
- 150ml water
- Tomato puree
- Cheese, e.g. cheddar or mozzarella
- Dried oregano
- Additional pizza toppings, e.g. ham, salami, olives (optional)
You will also need some extra flour for dusting your work surface and some extra olive oil for brushing the flatbreads.
Utensils
- Mixing bowl
- Kitchen scales
- Fork
- Tablespoon
- Rolling pin (or a clean, empty bottle)
- Frying pan
- Baking brush (if you don’t have a brush you can use the tablespoon)
- Spatula
- Baking tray
- Cheese grater (unless you are buying already grated cheese)
Directions
- In a bowl, mix the flour, salt and water. Stir with a fork until they start to come together, then use your hands to mix them together into a rough dough. It will be slightly sticky.
- Cover the bowl and leave to rest for 10 minutes.
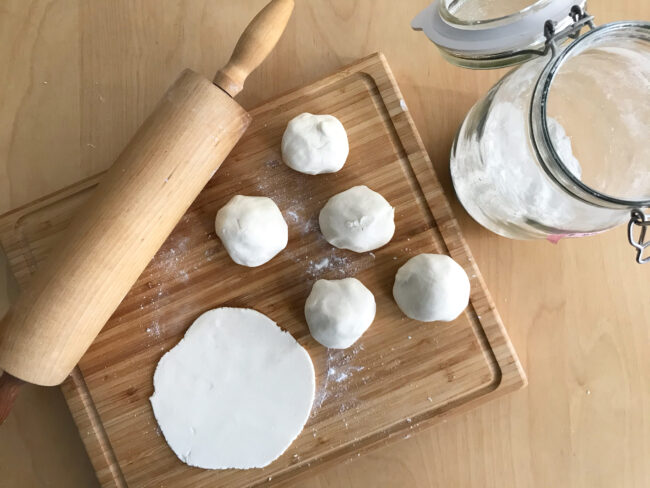
- Transfer the dough to a floured surface (e.g. your kitchen table) and knead for 1-2 minutes until you have a smooth dough.
- Divide the dough in to six portions. Roll each of the portions in to a ball with your hands, then use the rolling pin (or bottle) to roll each ball in to a flat circle ca. 10-12cm in diameter.
- Heat the frying pan over a medium heat. Brush one side of each circle with some olive oil. If you don’t have a baking brush, you can drizzle some oil on and gently spread it around as best as you can with the back of the spoon.
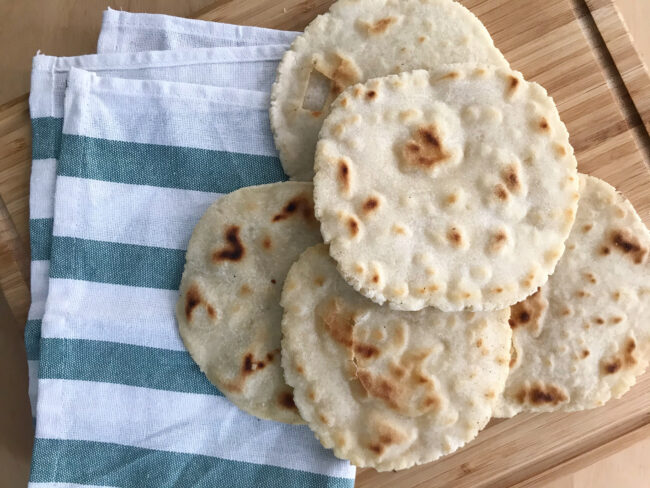
- Use the spatula to transfer a dough circle to the frying pan, oily side down. Fry for 3 minutes on each side until it is golden and cooked through. Repeat with the other dough circles (to speed up this step, you could use more than one frying pan if you have).
- Pre-heat the oven to 200C for a regular oven or 180C for a fan oven.
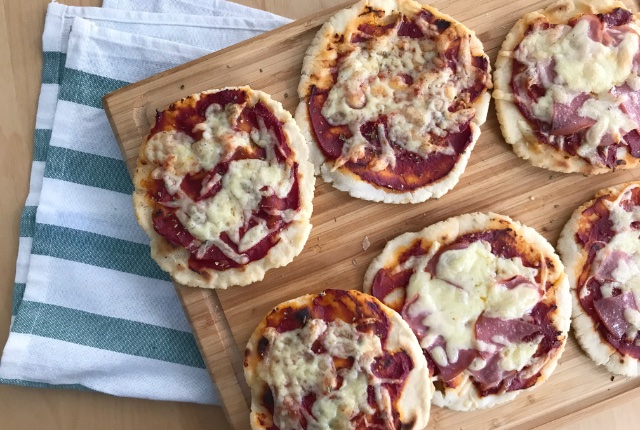
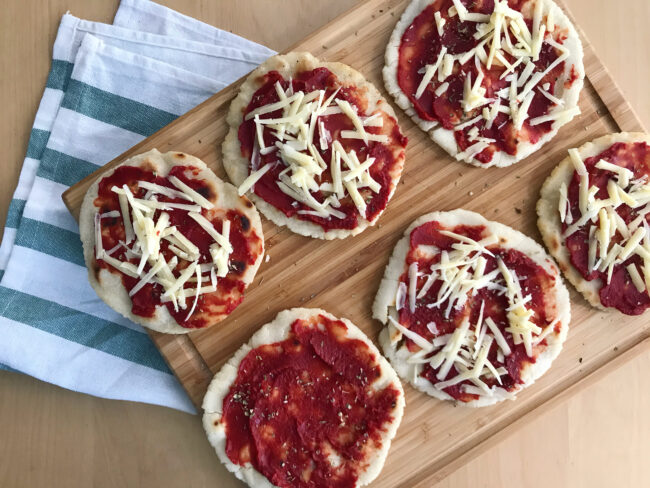
- Once all the flatbreads are cooked, transfer half of the flatbreads to a baking tray, spread one side of each flatbread with a squeeze of tomato puree (use the back of the tablespoon to spread it around), a sprinkle of oregano and some grated cheese. If I’m planning ahead I use mozzarella, if I’m doing it short notice I usually use cheddar as that’s what we tend to have in the house. If you want, you can also add some other favourite pizza toppings – my boys chose ham and salami for half of them.
- Bake in the over for 8-10 minutes until the cheese is melted and golden.
- Repeat with the other half of the flatbreads. If you have a fan oven and more than one tray, you can also put both batches in at the same time, swapping the trays over half way through.

What kids can help with
- Measuring ingredients.
- Kneading the dough.
- Rolling out the dough.
- Spreading on the tomato puree and adding the pizza toppings.
Adults only
- Grating cheese.
- Handling hot pans and ovens.
- Handling sharp knives (if chopping up addtional pizza toppings).
If you enjoyed today’s activity, please feel free to leave a comment or tag me in on Twitter and Instagram. Remember to use the hashtag #BearAndFoxSummerCamp if you are sharing any photos. If you are looking for other recipes to make, check out our complete recipe archive.
[line]
All Summer Camp activities are free to make them accessible to as many people as possible. However, if you enjoy the activities and are able to, you can support me with a donation on Ko-fi. Just hit the button below. Every little helps and is much appreciated. Thank you.
Sarina Jackson
We love pizza and my son has to eat gluten free too