{DIY} Fairy Lights are not just for Christmas
I have to admit, I absolutely love fairy lights. In our flat in Edinburgh I had some up all year round. Inevitably, people would say “you forgot to take your Christmas lights down”. No, not Christmas lights, fairy lights! Humpf. Well, here’s an idea for how to give your fairy lights a second life during the rest of the year.
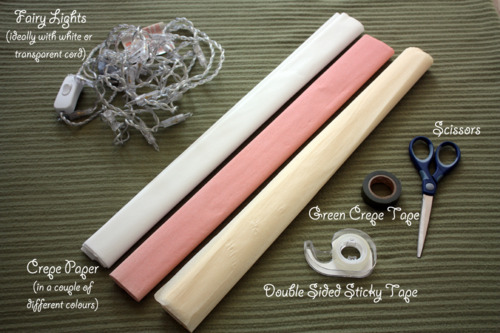
You will need:
- A set of fairy lights (white/transparent is best, but any will do)
- Crepe paper in at least two different colours (I used three and made different combinations)
- Double sided sticky tape
- Green crepe or washi tape
- A pair of scissors
Directions:
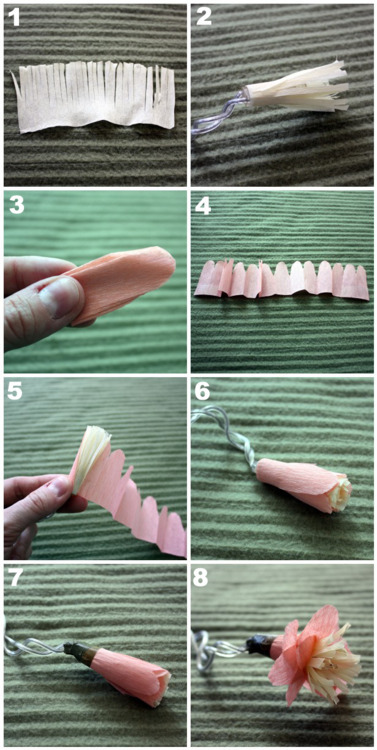
- Choose a colour for the inside of your flower, and cut a piece of crepe paper about 5cm x 10 cm. Cut fringes into it along the long side.
- Fix one end of the crepe paper on to a fairy light with double sided sticky tape, wrap it tightly around, then stick the other end in place.
- Choose a colour for the outside of your flower, and cut a piece of crepe paper about 5cm x 15cm. Fold it up about 2cm and cut out a petal shape. Be careful to cut the petal only about half of the way down, otherwise your strip of paper will fall apart into lots of little bits.
- When you unfold it, it should look something like this.
- Wrap the petal strip around the fairy light as before, fixing both ends in place with double sided sticky tape.
- It should now look something like this.
- Cut a piece of green crepe or washi tape ca. 15 cm long. Wrap it around the bottom end of the fairy light – it both makes it look more like a flower, and fixes the crepe paper in place.
- FInally, pull apart the crepe paper to create petals, and also to create some space around the lightbulbs so that they don’t get to hot.
Note: Never leave your lit fairy lights unattended! Check regularly that the paper petals are not too close to the lightbulbs.


One Comment