Simple Halloween Lunch Box Ideas
It’s almost Halloween. I normally don’t spend much time on cute lunch boxes for my kids, it’s just a quick ‘pack and go’ in the morning, but last year I got up a little earlier on Halloween morning to have some fun with it. The boys really loved their surprise. This year, Halloween falls on a Friday when they come home at lunch time, so I wasn’t planning to do it again and they get school canteen lunches on a Thursday anyway. Or so I thought. My youngest has an outing today, so they’ve all been told to bring in packed lunches! He was super sad about this, because he’ll be missing this week’s special Halloween themed canteen lunch, so it was Halloween lunch boxes to the rescue again!
Compared to some of the amazing themed lunch boxes you see on the socials, my efforts are still quite basic. I’m not ashamed to admit I’m drawn to all the shop bought lunch box items that have just been repackaged for Halloween. Yes, it’s totally just a marketing ploy, but it’s only once a year and it’s enough to put a huge smile on my kids’ faces. So this is really just to show you how to put together a simple Halloween lunch box with just a few easy swap outs.
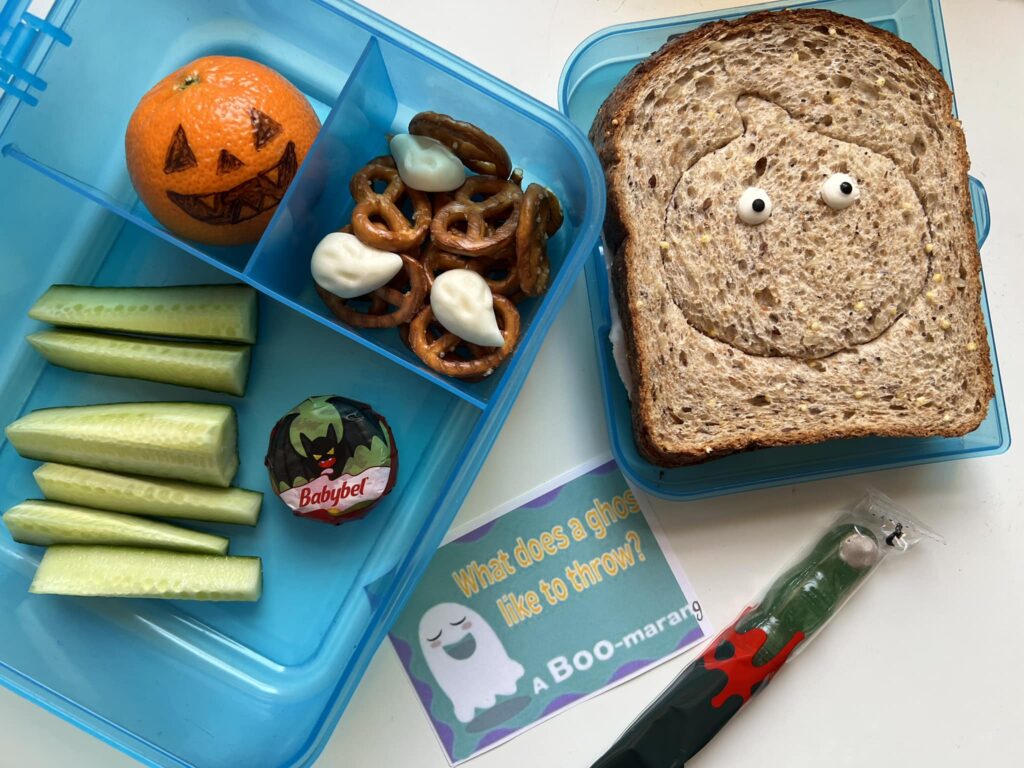
Most days, the main part of their packed lunch is a sandwich. We have some giant Halloween cookie cutters, and initially I was going use them to cut out the sandwiches, but then half the sandwich would have been missing! And what to do with the left overs? The internet suggest using them to make croutons, but I think we all know what the chances of that happening are… So, to prevent waste, I thought why not just cut in to the top layer of the sandwich, but keep everything in place. And it worked really well, you can totally see what it is. It also means if you don’t have giant cookie cutters but maybe just smaller ones, you could press two or three smaller patterns in to the bread instead. I also had some sugar eyes left over from previous baking, so stuck them on with some cream cheese, but that’s totally optional.
Anyway, so the sandwich was the one thing that was a bit of extra work. The other was the tangerine/ mandarine/ satsuma (I never know which is which, but you know what I mean!). Whip out a black permanent marker, draw on a spooky Halloween lantern face, and you’re done! So simple!
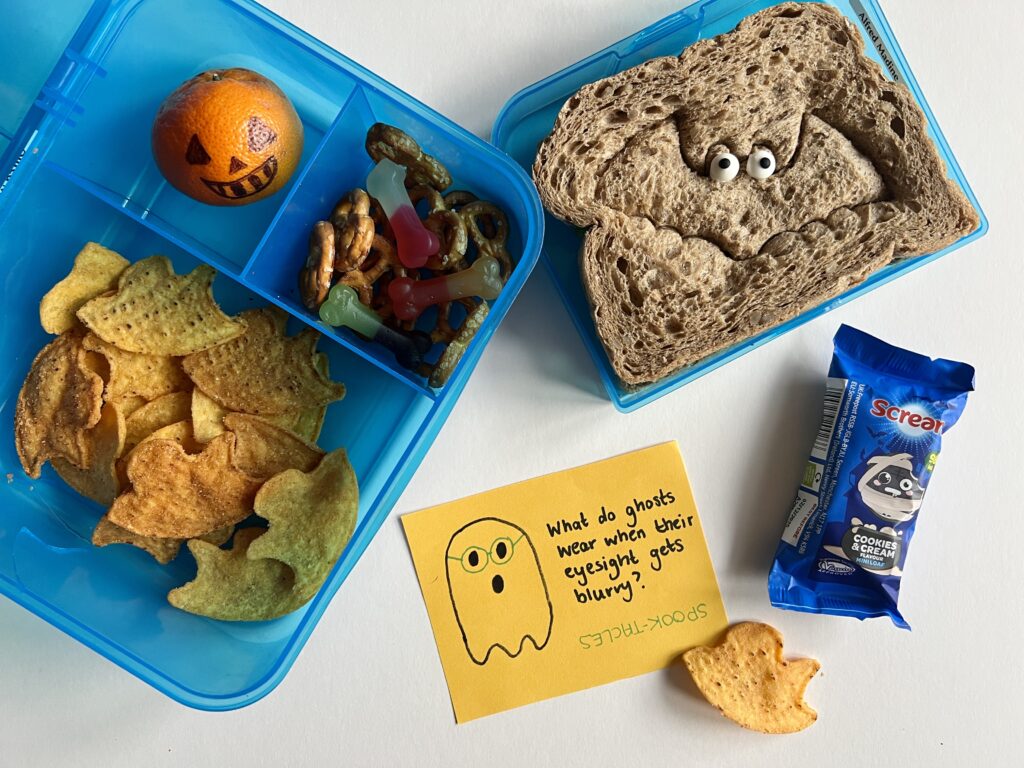
The last lunch box addition that required a bit of extra work, was the joke. This is entirely optional, but who doesn’t love finding a surprise joke at the bottom of their lunch box? My kids certainly do! Last year, I found some free printable jokes on the internet. This year, I didn’t have time to faff around with the printer so I quickly wrote some out myself. There’s no shortage of Halloween jokes going around, so just search it up and pick one you like.
And that was it really in terms of extra effort above what it normally takes to throw together their lunch boxes. Everything else was off the shelf/ ready to go and just needed added in. Obviously it will vary for you, depending on what your local shops have available, but here’s a full breakdown of what went in to each lunch box:
Year 1
- Sandwich with cookie cutter imprint and sugar eyes
- Tangerine/ mandarine/ satsuma with face drawn on
- Cut up cumber sticks (a lunch box favourite in our house)
- Halloween themed Babybel
- Mini pretzels with a couple of ghost gummy sweets (sorry, can’t remember where they were from)
- Witch’s finger lollipop (from Flying Tiger Copenhagen)
Year 2
- Sandwich with cookie cutter imprint and sugar eyes
- Tangerine/ mandarine/ satsuma with face drawn on
- Ghost shaped ‘spooky tortillas’ from M&S
- Mini pretzels with a couple of ‘Bone Shaker’ Haribo sweets
- Halloween themed Soreen Mini Loaf
And that’s it, job done! Only took about an extra 5 minutes each time. Do you do anything special for your kids lunches at Halloween? I’d love to see any pictures, so please do feel free share or tag me on Bluesky or Instagram! Have a great Halloween, everyone.